Workflows allow you to design and customize the CRM process to meet your specific business needs. Workflows are based on the Main Object selected on the Objects list.You can setup workflow rules and activate or deactivate a workflow cording to your need. You can copy an existing Workflow for the same or the different user group(s). The UI is same as creating a new Workflow. You can also modify the condition in the copied Workflow. Follow the steps below to work with the Workflow screen.
Selecting Workflow from the Project Setup menu displays the Workflow screen, as shown below. Existing Workflows are displayed on a Workflows list. Follow the steps below to work with the Workflow screen.

Workflow Screen
The following columns of information are displayed for each item on the list.
| Fields | Description |
| Workflow Name | Workflow Name is the name of the Workflow. |
| Workflow Description | Workflow Description is a description for the Workflow. |
| Group Name | Group Name is the Group that the work flow is associated with. |
- Select the Main Object for which you want to display Workflows from the Object list.
- Click New to create a new Workflow.
- Click Edit to make modifications to a Workflow selected on the Workflows list.
- Click Copy to make a copy of a Workflow selected on the Workflows list.
- Click Delete to remove a Workflow selected on the Workflows list.
- Click Rules to display the Workflow Rules screen, which is used to create Rules specific to Workflows within SF CRM. Please refer to the Workflow Rules section of this document for details on creating Workflow Rules.
- Click Actions to define available user actions on objects, such as Assign or Edit, etc
New Workflow
Clicking New on the Workflow screen displays the Generic Workflow window, illustrated below. Follow the steps below to create a new Workflow.

New Workflow Screen
- Enter a name for the new Workflow in the Name text field.
- Select a User Group, or Groups, to associate the new Workflow from the User Group Use the Ctrl or Shift key to make multiple selections.
- Enter a description for the new Workflow in the Description text field.
- Click OK to add the new Workflow to SF CRM. The Workflow Designer, described on the following page, is displayed.
- Click Cancel to exit this window without saving a new Workflow.
- Once you have created a new Workflow as described on the previous page.
Workflow Designer Window
Once you have created a new Workflow as described on the previous page, the Workflow Designer window, shown below, is displayed. This screen is used to design the Workflow you are in the process of creating. Follow the steps below to work with the Workflow Designer window.
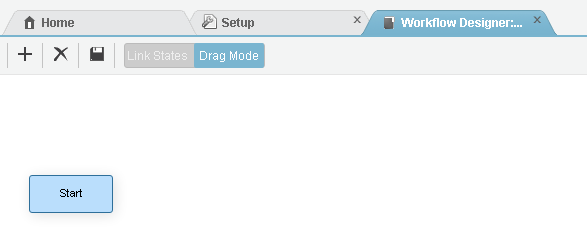
Figure 5.5.2.a
- In the above image, note the new “plus” buttons which have been added. Now to create / Manage a state click the
 icon and select Manage State. Refer to the image below:
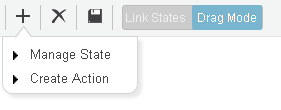
Figure 5.5.2.b
- The Manage State pop-up appears. If you want to add any existing state then select from the drop down and click Add.
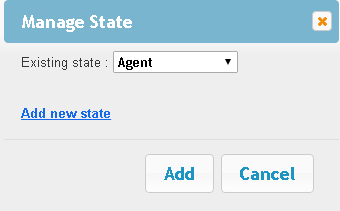
Figure 5.5.2.c
- If you want to create a completely new state, click Add New state
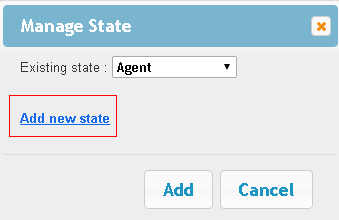
Figure 5.5.2.e.
- Enter the state name and click Save.
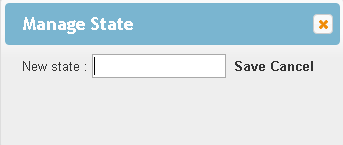
Figure 5.5.2.g.
- Now, select the new state from existing state drop down and click Add. The new state will appear in the work flow as shown in the image below:
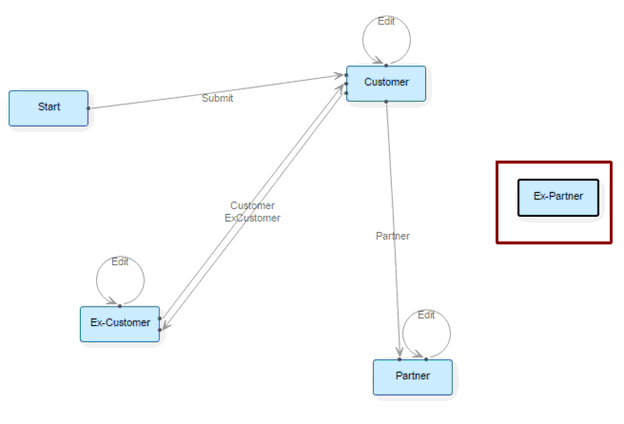
Figure 5.5.2.h.
- To link two states click Link States.
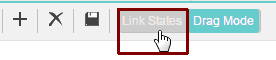
Figure 5.5.2.i.
- Then place the cursor on the state from which you want to link (source state) and drag the cursor on the state (destination state) to which you want to link. In this example, we will link the Ex – Partner state with the Partner state. So, place the cursor on Ex-Partner and drag to the Partner state. Refer to the image below:
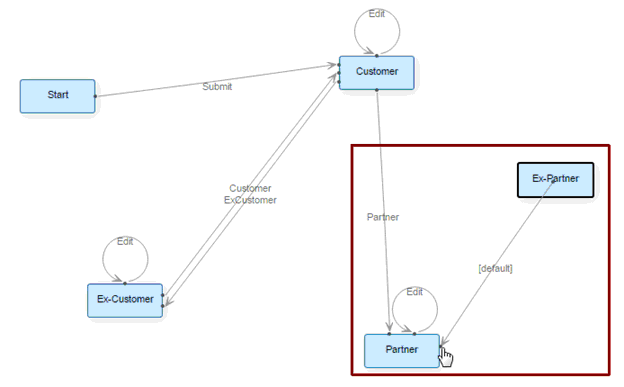
Figure 5.5.2.j.
- Click on default to change the details of the action. Refer to the image below:
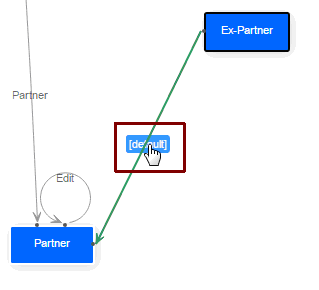
Figure 5.5.2.k.
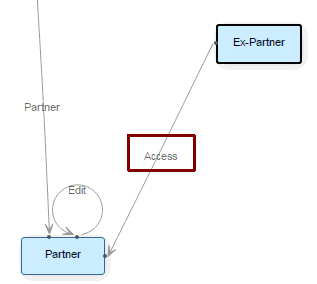
- A new Action Setup window appears . Enter the details such Action name, Sub-form to use etc and click OK.

Figure 5.5.2.l.
- The action will be changed as shown in the image below:
The Completed Workflow Designer window, shown below in Figure 3-34, below is a completed example of a Workflow Design:
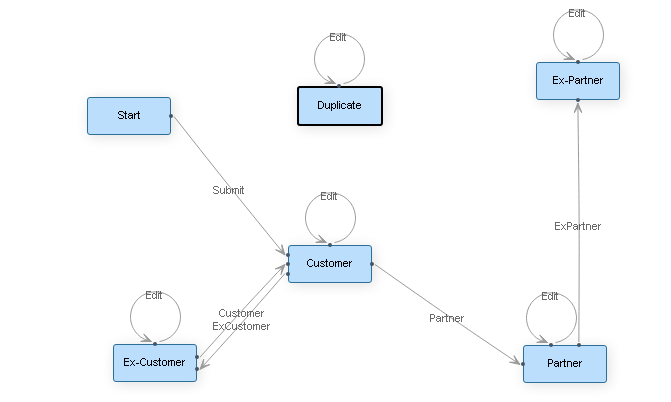
Figure 5.5.2.n.
Modify Workflow
Clicking Edit for a line on the Workflows list displays the Generic Workflow window, shown below for that Workflow, allowing you to make changes to an existing Workflow’s settings. Follow the steps below to modify an existing Workflow.

Modify workflow screen
- Modify the name for the Workflow in the Name text field.
- Select a User Group, or Groups, to associate the new Workflow from the User Group Use the Ctrl or Shift key to make multiple selections.
- Modify the description for the new Workflow in the Description text field, if necessary.
- Click OK to display the Workflow Designer, described earlier, and make any necessary changes to the Workflow Diagram.
- Click
 to exit this window without making any changes to the Workflow.
Copy Workflow
Clicking for a line on the Workflows list allows you to quickly make a copy of an existing Workflow to generate a new one based on the existing Workflow’s parameters, perhaps very similar but for use by different User Groups. This is accomplished by using the same Generic Workflow window shown again shown below, that is used to create a new Workflow; however, when making a copy you will want to modify the settings in place for the original.

Modify Workflow screen
- Modify the name for this copy of the Workflow in the Name text field.
- Select a different User Group, or Groups, to associate the copy of the Workflow from the User Group Use the Ctrl or Shift key to make multiple selections.
- Modify the description for the copy of the Workflow in the Description text field.
- Click OK to add the copied Workflow to SF CRM. The Workflow Designer, described earlier, is displayed.
- Click to exit this window without saving a new Workflow.
Delete Workflow
Clicking for a line on the Workflow list allows you to remove a Workflow from SF CRM. A Confirmation window, shown below, is displayed to ensure that is your intention. Click OK to remove the Workflow or click Cancel to exit this window without deleting the Workflow.

Delete workflow
Workflow Rules
Clicking Rules on the Workflow screen displays the Workflow Rules screen, shown below, where rules can be added to existing Workflows. Workflow Rules are displayed on a Workflow Rules list and can be worked with individually by selecting the corresponding Object. The Workflow Rule sits on top of a Workflow. If there is no rule defined, then the regular Workflow is called. Otherwise, the Workflow Rule takes precedence over Workflow.
The purpose of a Workflow Rule is to show a list of choices to the user and, based on the user’s selection open a specific Sub Form. For example, a customer support agent might pick a ticket priority when he/she creates a ticket. If the priority is high, the system will show a specific ticket Sub Form. Otherwise, it will show different ticket SubForm.
Follow the steps below to work with the Workflow Rules screen.

Workflow Rules
The following columns of information are displayed for each item on the list.
| Fields | Description |
| ID | System generated identifier for the Workflow Rule. |
| Name | The name of the Workflow Rule. |
| Status | The status of the Workflow Rule, either On or Off. |
| Object | Object is the Main Object associated with the Workflow Rule. |
| Action | Indicates the Action that was assigned to the Workflow Rule. |
| Field | The fields selected from the Fields list when the Workflow Rule was created. |
| Groups | Groups are the User Groups associated with the Workflow Rule. |
| Mapped List | A list of the Mapped Fields included in the Workflow Rule. |
- Select the Main Object that will be associated with the new Workflow Rule from the Object
- Click New to create a new Workflow Rule.
- Click Edit to modify a Workflow Rule selected on the Workflow Rules
- Click Delete to remove a Workflow Rule from the system.
- Click Workflow to return to the Workflow
New Workflow Rule
Selecting New on the Workflow screen displays the Add New Workflow Rule screen, shown below.

New Workflow Rules
- Enter a name for the new Workflow Rule in the Name text field.
- Select Available Groups for the new Workflow Rule by selecting them in the Available Groups list and then clicking Add to add them to the Selected Groups Multiple selections can be made by using the Ctrl and Shift keys. Conversely, move Groups from the Selected Groups list back to the Available Groups list by highlighting them on the list and clicking Remove, to move them one at a time, or Remove All, to remove them all at once.
- Select the Object to associate with the new Workflow Rule from the Object This selection automatically populates the Sub-forms list.
- Select the Action to be taken when the Workflow Rule is fired from the On Action
- Select the Field to associate with the new Workflow Rule from the Field
- The Field Values list is populated with the available Fields within the selection made on the Field Move Field Values and the associated Sub-form to the Mapped Fields list by highlighting a Field on the Field list and clicking Add. Conversely, move Fields and their associated Sub-forms from the Mapped Fields list back to the Available Fields list by highlighting them on the list and clicking Remove, to move them one at a time, or Remove All, to remove them all at once.
- Click Save to save the new workflow rule.
- Click onto return to the Workflow Rules screen.
- Click
 Workflow to return to the Workflow screen.
Modify Workflow Rule
Clicking Edit for a line on the Workflow Rules list displays the Modify Workflow Rules screen, shown below. Follow the steps below to make modifications to an existing Workflow Rule.

Modify Workflow Rules
- Select the Status On or Status Off radio button to change the Rule’s status, if necessary.
- If necessary, move Field Values and the associated Sub form to the Mapped Fields list by highlighting a Field on the Field list and clicking Add. Conversely, move Fields and their associated Sub Forms from the Mapped Fields list back to the Available Fields list by highlighting them on the list and clicking Remove, to move them one at a time, or Remove All, to remove them all at once.
- Click
 to save any changes to the system.
 - Click
 to return to the Workflow Rules screen.
Delete Workflow Rule
Clicking for a line on the Workflow Rules list allows you to remove a Workflow Rule from the system. A Confirmation window is displayed to ensure that is your intention. Click OK to delete the Workflow Rule or click Cancel to exit this window without deleting the Workflow Rule.

Delete Workflow Rules
Actions
Clicking Actions on the Workflow window displays the Actions screen, shown below. Actions are displayed on the Actions list and represent the actions for an object on SF CRM as set by a SF CRM Administrator. The SF CRM Administrator uses the Actions table to define available user actions on objects, such as Assign or Edit, etc. The Work Flow table organizes the actions and determines the order that a user’s actions are performed.

Actions screen
The following columns of information are displayed for each item on the list.
| Fields | Description |
| ID | ID is the Identification Number. |
| Object Name | The Object Name is the table name for which you have selected to create an action. |
| Action Name | An Action Name is the action given to the respective object. This allows an Administrator to use a Workflow to define when these actions will be available to the users. |
| Custom Code | A custom code can be activated with the option Yes/No. |
- Select the Object from the Object list who’s Actions you want displayed on the Actions list.
- Click New to create a new Action.
- Click Edit to modify an existing Action.
- Click Delete to delete an Action from the system.
- Click Workflow to return to Workflow screen.
New Action
Clicking New on the Actions screen displays the Action Setup screen, shown below, which is
used to create a new Action within SF CRM. Follow the steps below to work with the Action Setup
screen.

New Actions screen
- Select an Object with which to associate the new Action from the Object Name
- Enter a name for the new action in the Action Name text field.
- Indicate whether or not the new Action will be a Batch Action by selecting Yes or No from the Batch Action?
Note: When you specify an action as a Batch Action, you can perform that Action on multiple records. There are a few system-provided Batch Actions like Edit, Delete, etc. You can also create your own Batch Action and write your own code on how it should perform.
- Enter whether there will be a custom code for the new Action by selecting Yes or No from the Custom Code?
Note: The Custom Code feature lets the system know that there is a custom functionality in that action. For example, you could have an Action called Edit on the Contact Object. If you set custom code as “no”, and click on edit, the system will go directly to the form and perform the standard operations. If you set custom code as “yes”, the system will look for a custom implementation of the standard operations.
- Click Save to save the new Action to the system.
- Click
 to exit this screen without creating a new Action.
Modify Action
Clicking Edit for a line on the Actions list displays the Action Setup screen, shown below.
Use this screen to make modifications to an existing Action.

Modify Action
- Select a different Object with which to associate the Action by making a different selection from the Object Name list, if necessary.
- Modify the name of the action in the Action Name text field, if necessary.
- Change whether or not the Action is a batch Action by selecting Yes or No from the Batch Action? list, if necessary.
- Change whether or not there will be a custom code for the Action by selecting Yes or No from the Custom Code? list, if necessary.
- Click Save to save any changes to the system.
- Click to exit this screen without creating a new Action.
Delete Action
Click Delete for a line on the Action list to remove that Action from SF CRM. A Confirmation window will be displayed to ensure that is your intention, as shown below. Click OK to delete the
Action or click Cancel to close the window without deleting the Action.

Delete Action