Steps for using Soffront Import Tool.
Functionality #1 – Data Import
Case 1. Importing data to the CRM for the first time to a single Table.
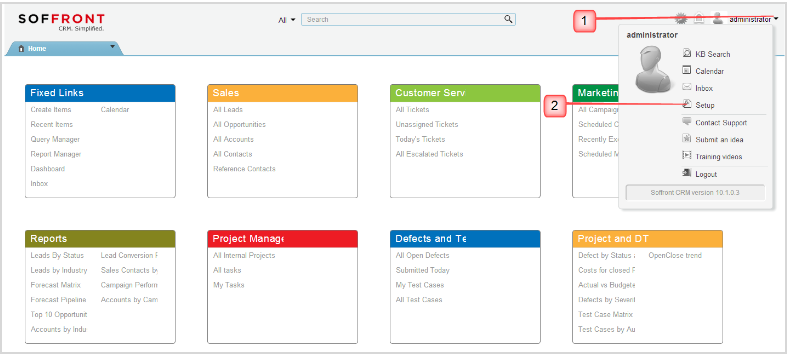
- Click on your name on the Upper Right corner to open the profile Menu.
- Click on Setup
- Expand Import/Export
- Click on Import records
- Click on the Drop Down for Database management System and select the Source Database
- Furnish the Data source Information like the Location/File name, Field Separator, Text Delimiter and Destination Table.

- Click on OK to reach the field Mapping page.
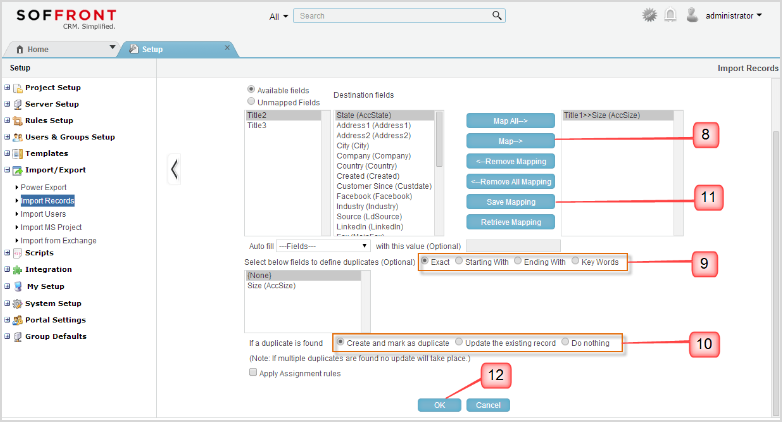
- Map the source and destination fields by selecting the fields from the corresponding list boxes and clicking Map.
- On completion of Mapping select below fields to define duplicates to check for duplicates during import.
- After defining the fields, define an action for the Duplicate records from the given options.
- Save the mapping using Save Mapping
- Click on OK to start the import.
Case 2. Importing data to the CRM for the first time to 1 parent table and multiple child tables.
- Steps
- Follow Steps 1 to 6 in (functionality#1, Case1) to map fields for the parent table
- Click on the Dropdown “Table Name” and select a child table.
- Map fields and define duplicate and actions on the child table by Following steps 6 to 8 in (functionality#1, Case1)
- Repeat steps 2 and 3 (functionality#1, Case2) to map fields on any other child table.
- Once complete Save the mapping by clicking on “Save Mapping”
- Click on OK to begin uploading.
Case3. Importing data to a child table and linking to an existing Parent record.
- Steps
- Click on your name on the Upper Right corner to open the profile Menu and click on Setup
- Expand Import
- Click on Import records
- Furnish the Data source Information like the file format , the location of the source files
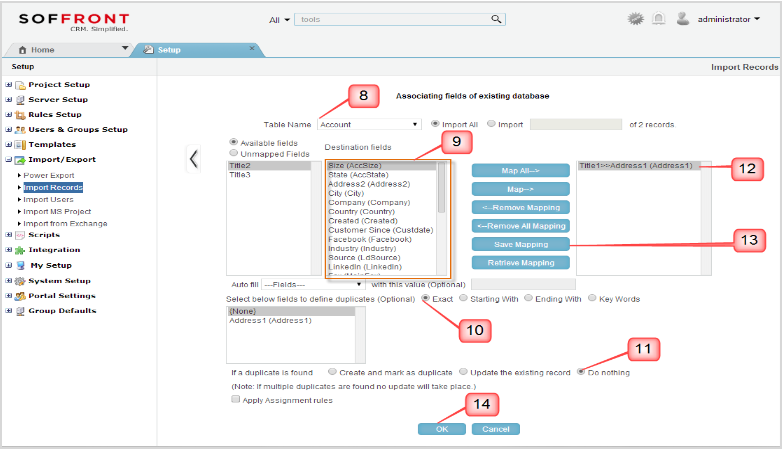
- Click on the Table Name Dropdown and select the Parent table which has existing data.
- Map a field which is unique (E.g. ID or Email address etc)
- Note this field and corresponding data must be already present in the CRM
- The data corresponding to this field “Must Exactly match” with the Data on the Source file else records will be created.
- The system will use this field to locate the parent record then upload and link the child records.
- In this step the duplicate checking Criteria “Exact” is recommended.
- Select the action “If a duplicate is found” as radio button “Do nothing”
- Once the field from the parent table is mapped.
- Select the Child table for the “Tables Name” Dropdown
- Map all the fields from the child table.
- If necessary define a field to check for duplicate records.
- Select a suitable action if a duplicate record is found.
- Save mapping
- Click ok to upload the data.
Functionality # 2: Data Update
Case 1: Update existing data on a Parent table using a source data file.
Steps:
- Follow steps 1 to 7 (functionality#1, Case1)
Note :
- The Key field selected in step 7 must be already present data , otherwise new data will be created.
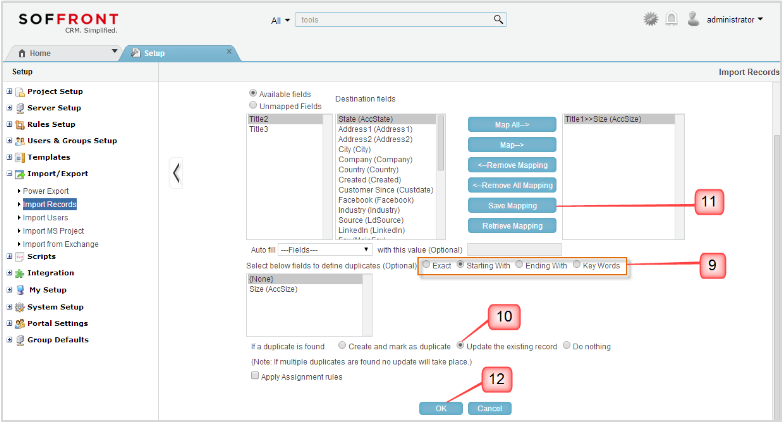
- The Matching criteria should be appropriately selected in the Step (Eg. Exact Match-recommended, starting with , Ending with , anywhere in the string)
- Select the Option “Update Existing Records” in step 10 (functionality#1, Case1)
- Save the field mapping and Click OK to start uploading the data.
Functionality # 3: Link Records
Case: link records existing in two tables
- Click on your name on the Upper Right corner to open the profile Menu
- Click on Setup
- Expand Import/Export
- Click on Import records
- Click on the Drop Down for Database management System and select the Source Database
- Furnish the Data source Information like the Location/File name, Field Separator, Text Delimiter and Destination Table.
- Click on OK to reach the field Mapping page
- Click on the Table Name Dropdown and select the Parent table which has existing data.
- Map a field which is unique (E.g. ID or Email address etc)
- Note this field and corresponding data must be already present in the CRM
- The data corresponding to this field “Must Exactly match” with the Data on the Source file else records will be created.
- The system will use this field to locate the parent record then upload and link the child records.
- In this step the duplicate checking Criteria “Exact” is recommended.
- Select the action “If a duplicate is found” as radio button “Do nothing”
- Once the field from the parent table is mapped. Map 1 or 2 fields from the child table.
- Define the same field as the parent to check for duplicate records.
- Save mapping
- Click ok to upload the data.