Soffront Mobile allows you to access your Soffront Enterprise CRM data from your mobile devices. It is available for iPhone and Android mobile devices. you can open your mobile CRM on any browser such as Safari, Chrome and Firefox. Any data you add from your mobile device will sync with your Soffront Enterprise CRM and similarly data added from Enterprise CRM will be available on your Soffront Mobile.
you will be able to:
- Add Contacts on the go.
- Create tickets and then close them once they are resolved.
- Add and complete Appointments
- Make calls, send emails and messages.
- Add notes and update leads , opportunities and customers
System Requirements:
- iPhone iOS6 or newer versions
- Android OS 4.0 or newer versions
Signing In:
This is Soffront mobile sign in page. Type in your user name and password. Check remember me if you want your browser to remember your login information (Optional). Then click on sign in to access your account. The home screen is the list of all your contacts. swipe right to access the menu.
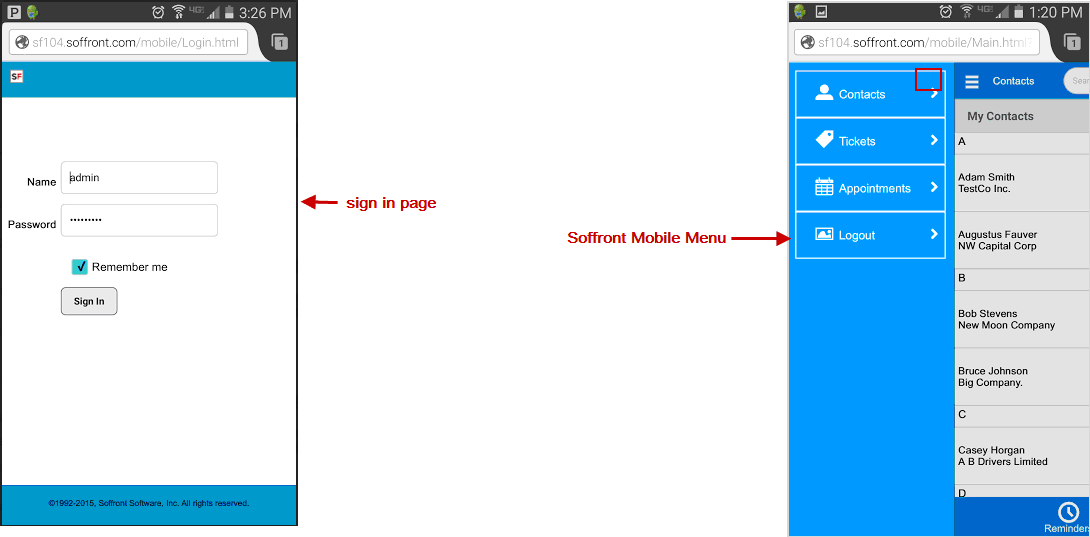
Contacts:
Once you sign into your account. You will find all your contacts in a list, arranged in alphabetical order. The list displays the name of the contact and their respective company. From this screen you will be able to search for contacts, add new contacts, see contact details and more.
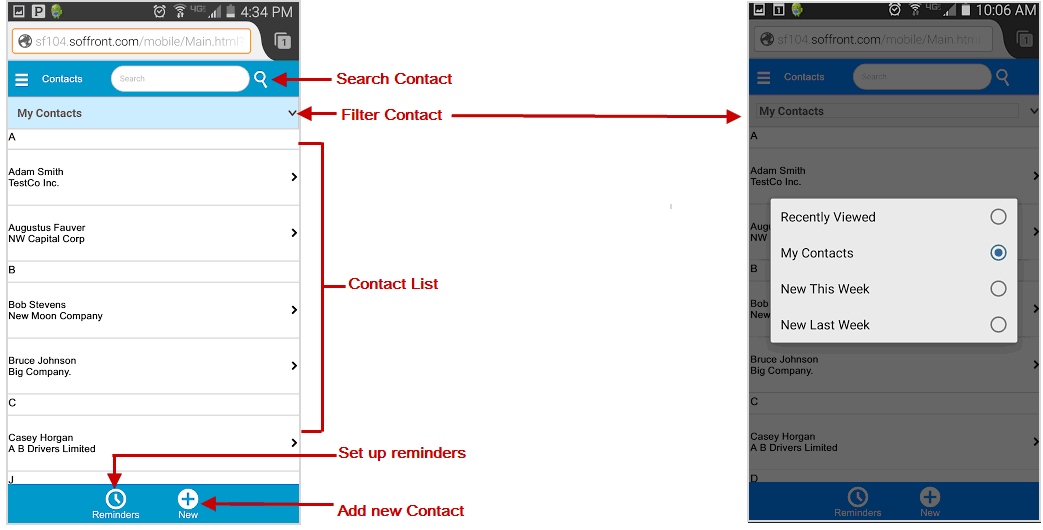
Quick Search Contacts
Quick search allows you to search your contact list for the following fields : Full name, Company, Job title, Business phone, email, Mobile, Address, City, State, Zip and Country.
Contact Filters:
Contact filters allows you to screen contacts and narrow down your search.
- Recently Viewed: This will bring up a list of contacts you have worked on in recent past.
- My Contacts: This will bring up a list of contacts assigned to you.
- New This week: All new contacts added this week.
- New Last Week: All new contacts added last week.
Note: The last two options will allow you to view newly added contacts and assign un assigned contacts to yourself or a sales representative.
Detail View:
From the contact’s list view click on a contact to see their detail view. Detail View displays contact details and related information on Leads, Opportunities, Customers, Tickets, notes and Appointments.
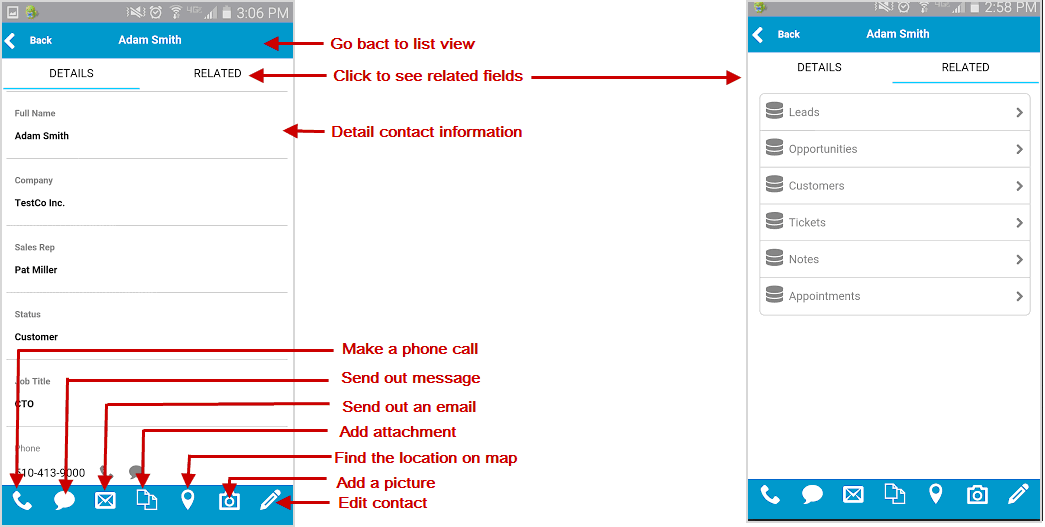
- Make a Phone call: Clicking the
 icon will initiate a phone call.
 - Send out message: Clicking the
 icon will open messenger from device
 - Send out an email: Clicking the
 icon will open send email dialog
 - Add attachment: Clicking the icon will open attachment page
- Click on Browse to find documents and images in your mobile.
- Click on Upload to add the document.
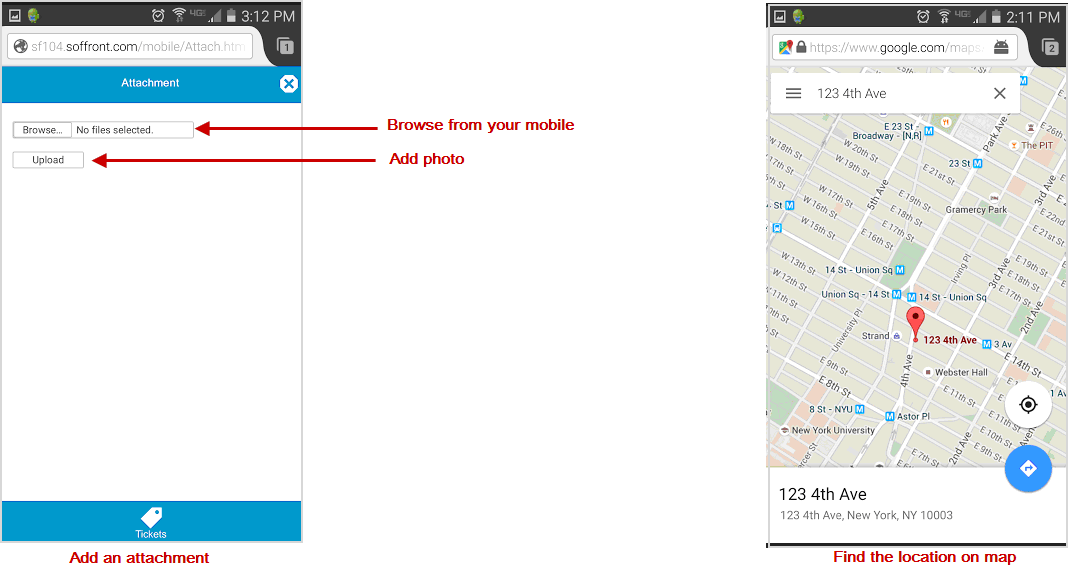
- Find the location on map: Click on
 icon to find the location on map and navigate to it.
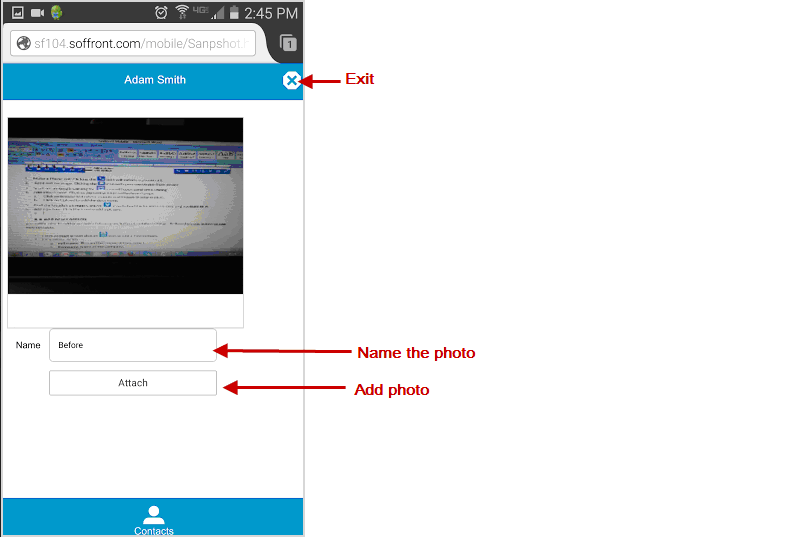
 - Add a picture: Click the icon to add a photo
- Allow Soffront to share your camera.
- Give a name to your photo, select from the list or type in .
- Click on Snap photo to capture the photo.
- Then click on attach to save the photo to your CRM
Add new Contacts:
you will be able to add new contacts from your Soffront mobile on the go. Follow the steps below to add new contacts.
- From contact screen click on
 sign to add a new contact.
 - Fill in all the fields
- Full Name: First and last name of the contact.
- Company: Name of the Company.
- Sales Rep: Assign a sales rep for the Contact.
- Status: It is the workflow stage you want to add the contact to.
- Job Title: Job title of the customer.
- Phone: Work phone number
- Email: Email address of the customer
- Mobile: Mobile phone number of the customer
- Address 1: Building and street name.
- City: Name of the City
- State: Name of state
- Zip: Zip code number
- Country: Country the contact is located in
- Click on save to add the contact.
Note: Full name field cannot be blank.
Edit Contacts:
Follow the steps below to edit a contact.
- From the contact list view click on the contact you want to edit.
- Then Click on the
 pencil icon at the bottom of the page.
 - Make changes to the contact then click on save.
Reminders:
Reminders helps you to remember upcoming appointments.
- To view reminders click on the
 reminders icon at the bottom of the page.
 - To view details of the reminder click on the reminder on the list view page.
- To add an attachment click on the
 icon at the bottom of the page.
 - To add a picture click on the
 camera Icon.
 - To add a note click on the
 note Icon.
- Select note type from the dropdown list
- Type in note details.
- Click on Save to add the note.

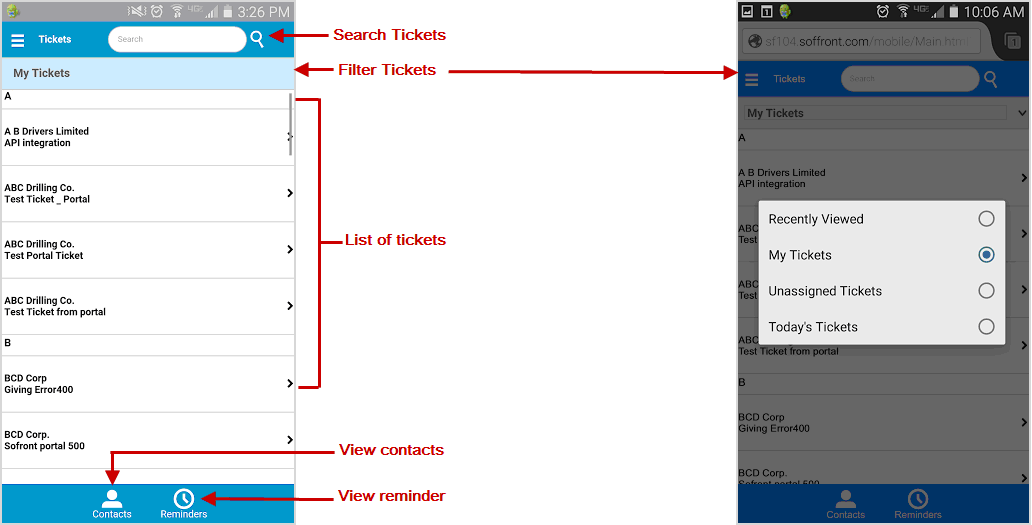
Tickets:
Tickets are issues or defects submitted by customers through phone, emails or customer portals. The tickets list view displays list of submitted tickets in alphabetical order. You can see the company name and synopsis of the ticket from the list view.
Ticket Quick Search:
Quick search allows you to search your tickets for the following fields : Status, Synopsys, Details, Company, Contact Name, Product and Assign to.
Ticket Filters:
Ticket filters allows you to screen tickets and narrow down your search.
- Recently Viewed: This will bring up a list of tickets you have worked on in recent past.
- My Tickets: This will bring up a list of Tickets assigned to you.
- Unassigned Tickets: Will bring up all tickets which are not assigned to anyone.
- Today’s Tickets: Tickets that has been submitted today.
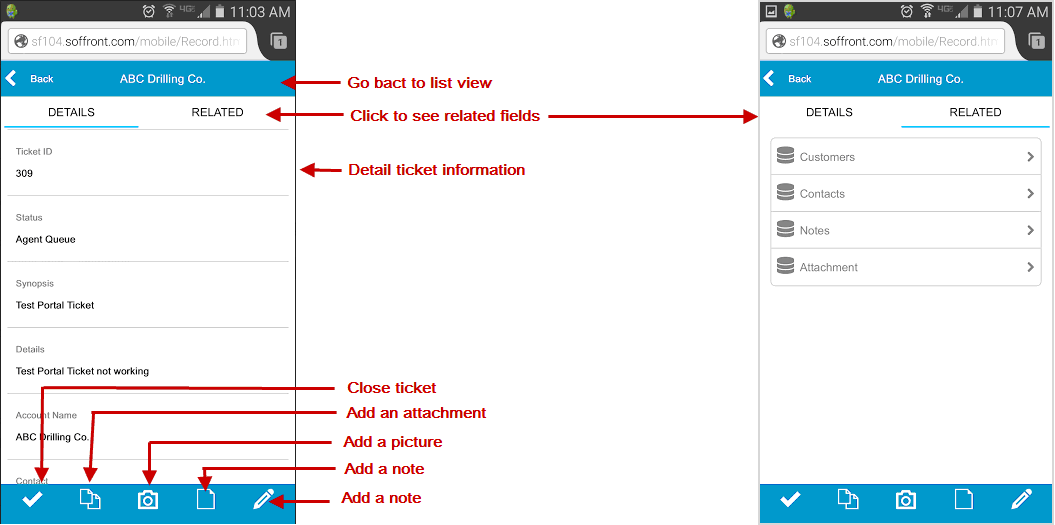
Detail view of Ticket:
From the Ticket list view click on a ticket to see their detail view. Detail View displays detail information about the issue and related information on the Customer, Contacts, Notes and Attachments.
Edit Ticket:
Follow the steps below to edit a ticket.
- From the Ticket’s list view click on the ticket you want to edit.
- Click on the pencil icon at the bottom of the page.
- Make changes to the ticket then click on save.
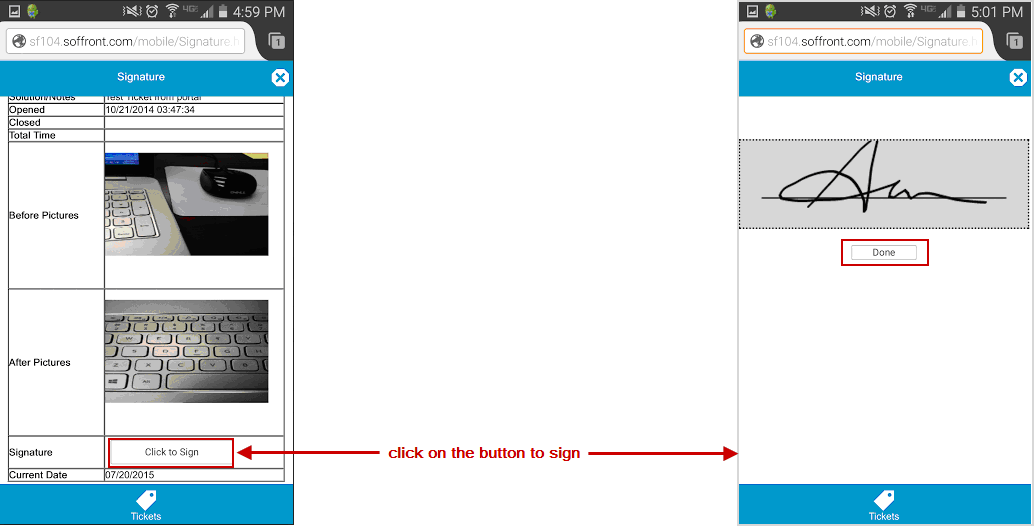
Close Tickets:
Follow the steps below to Close a ticket.
- From the Ticket’s list view select the ticket you want to close.
- Click on the
 icon at the bottom of the page.
 - Check the details of the ticket then click on Click to sign button to confirm the details.
- Get signature from the Customer then click on done to close the Ticket.
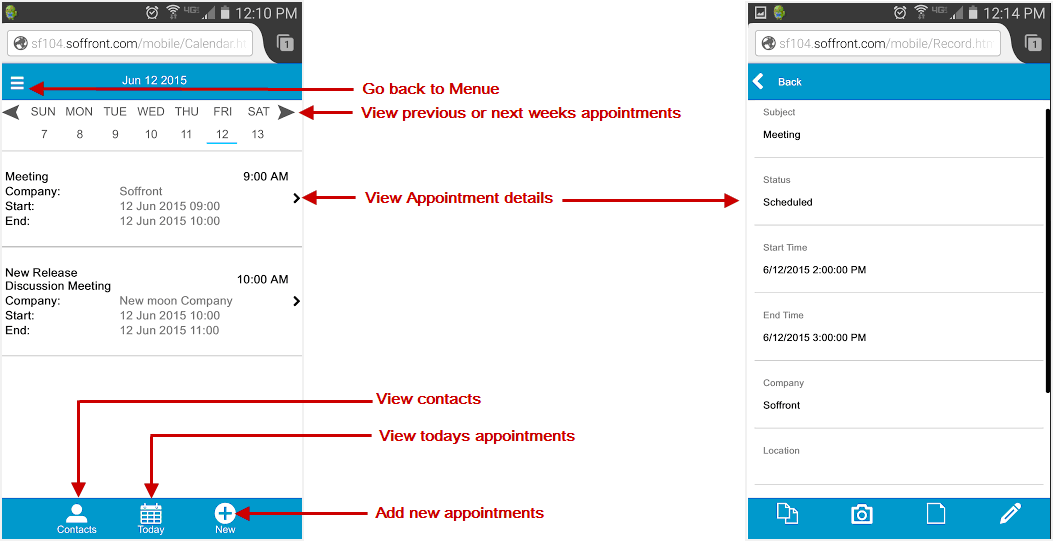
Appointments:
Appointments allows you to setup and manage meetings and appointments in your CRM . Appointments added through your mobile will sink with your soffront Enterprise CRM. By default you will see today’s appointments.
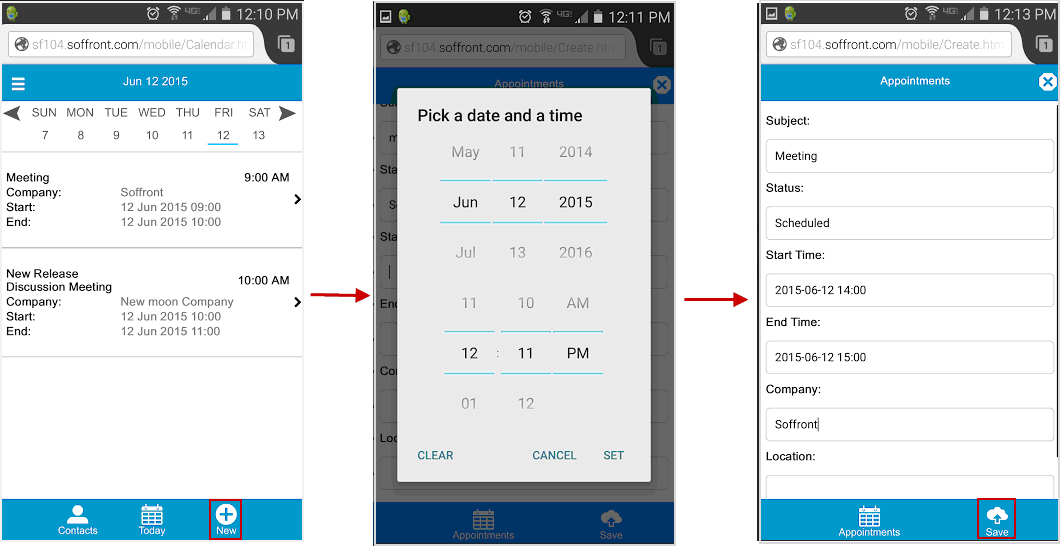
Create new Appointment:
- From appointments page click on New to create a new appointment.
- Fill in all the fields
- Subject: Subject of your Meeting
- Status: Select the status from the dropdown list. Select status as pending for new appointments. Other options are to cancel a appointment, mark it as done or in progress
- Start Time: Select start date and time for the appointment
- End Time: Select end date and time for the appointment.
- Company: Type in the name of the company
- Location: Type in the location of the appointment
Then click on save to create the new appointment.
Note: The system will warn you if you try to add an appointment in past date.
Edit Appointment:
Follow the steps below to edit an Appointment.
- From Appointment’s list view click on the Appointment you want to edit.
- Click on the pencil icon at the bottom of the page.
- Make changes to the Appointment then click on save. ( you can change the status of the appointment, subject, date, time and location of the appointment)
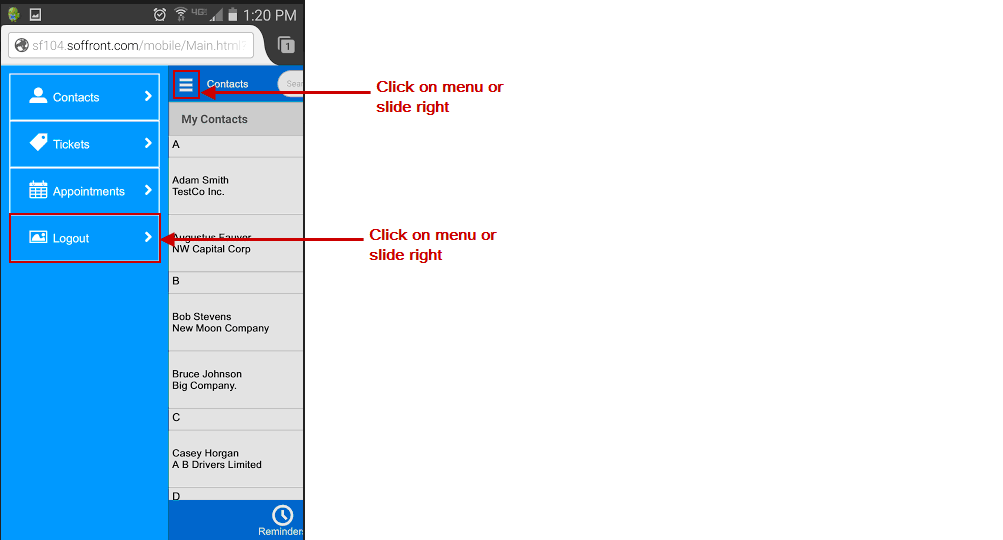
Log Out:
Follow the steps Below to logout of the system
- Click side menu image or swipe right on the home page to open side menu
- Click logout link from side menu to sign out.