Tab bar section
This contains all the open Tabs beside Home tab as you click on the links to open new tabs in the application.

- The Tab bar can accommodate as many as the Tabs respective to your screen resolution. The Tab labels will get squeezed to accommodate the maximum number of tabs it can hold.
- A new tab always opens next to your current Tab that you are viewing
- You can drag the tabs to change the Tab display sequence on the fly
- You can Refresh the Tab page by clicking on the tab icon
Tab page section
This holds the Tab page content. The tab page content stays resident until you refresh or close it.
The resident Tabs are useful when you need to work on two different things at the same time.Home is the default tab that gets loaded for you first. Home tab is considered to be your CRM navigation board. Please make sure your CRM administrator set up the right home layout containing the stuff that you might be needing to start with.

Viewing and Managing Record Information
There are two ways you can view and Manage records.i) from the list view using quick action listii) from Detail view action toolbar.
We recommend you using the list-view more and try doing your record operations using quick action list. This should give you better productivity while using your CRM.
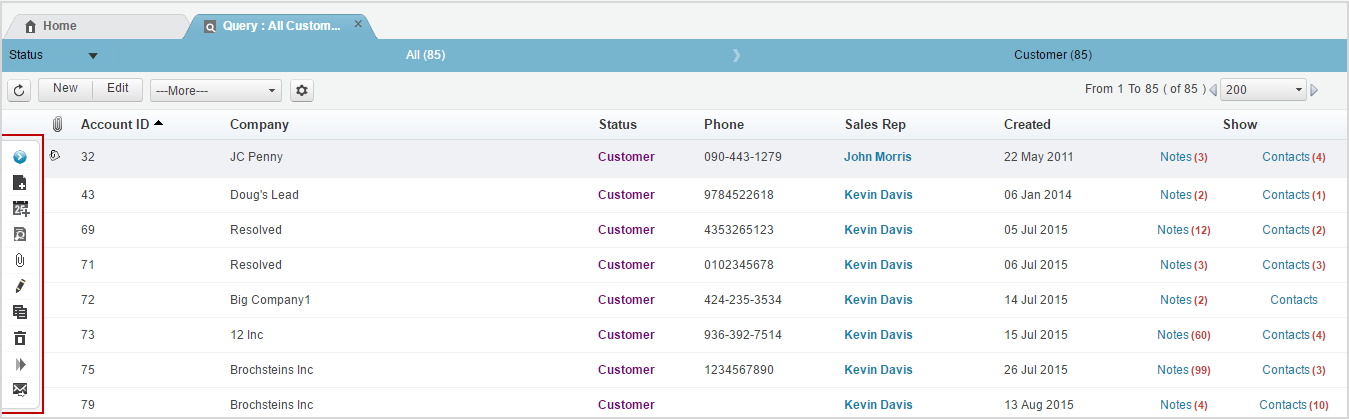
Using the actions marked in the screen above, you should be able to add Note and activity for the selected record in view. You can also perform
- Add a Note
- Add an Activity
- Show Notes
- Attach files, using the “Clip Icon”
- Modify record
- Copy Record
- Delete actions
- Forward an activity
- Send Email to Contact
for the selected record without going to detail view.
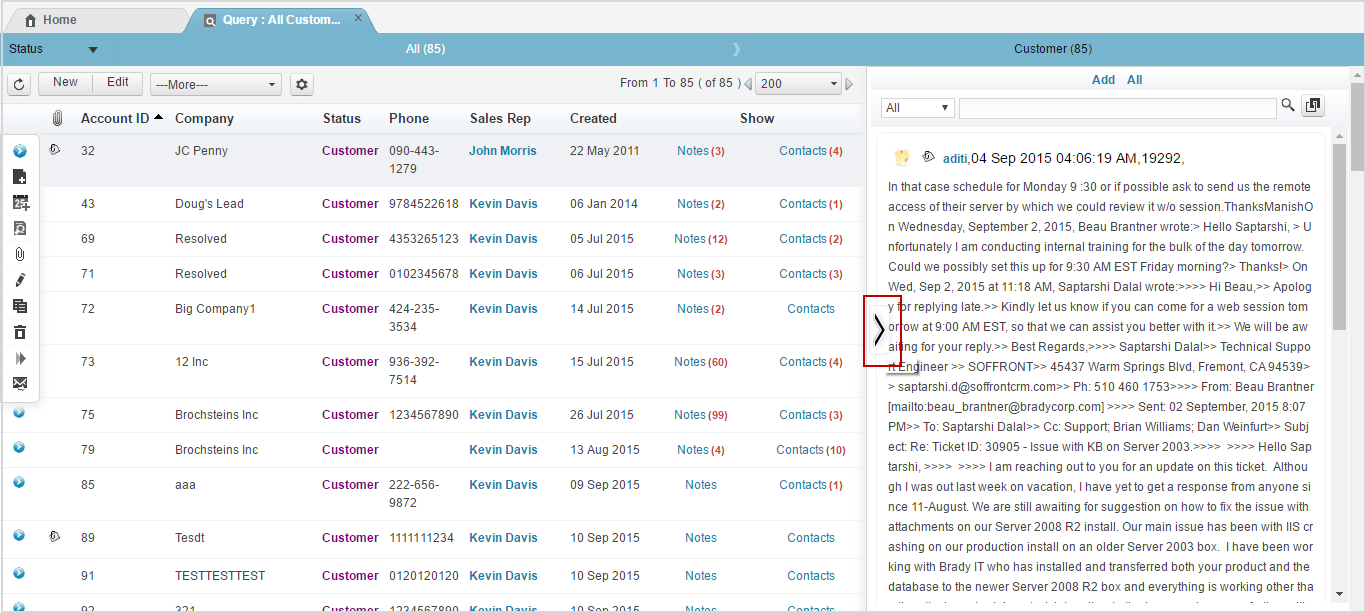
Show Notes would open all the notes associated with the record in a separate tab.Forward activity would let you roll forward your Activity to next convenient day of your choice, if any associated to the selected record in view.
Send mail would let you email to the the contact if found (checking Email type field value) in the selected record.
Customize view lets you set up your list view preferences, specially the linked table records (e.g. Contact, Note) that you like to see here. The composite list view comes very handy to check the last 5 Notes (or Contacts to call, check pending Activities) . Click on the link Table labels to open up the side bar widget to see the linked record details. You should be able to do Add new, find and link record or just view all linked record details in a separate Tab.
Use the Collapse arrow to close the composite list view widget
Detail View
This includes full view of the record and linked table (i.e Child tabs). The Child tabs holds the linked table records while the Detail tab holds the main record data and the record view menu bar to perform all record operations.
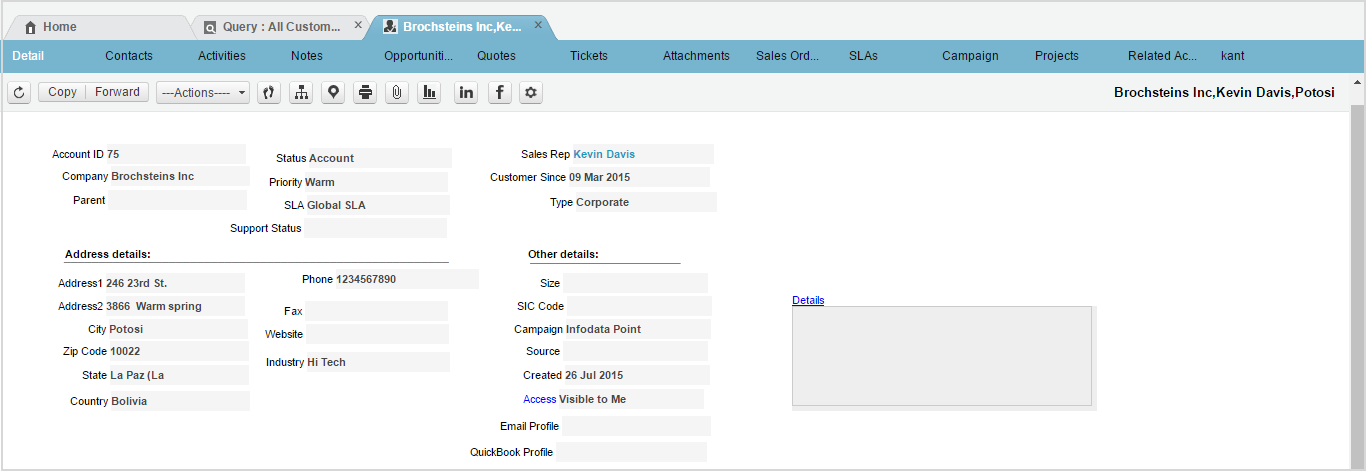
Refresh record: Refreshes the record details only. If you like to refresh the record along with the child tabs, then you may do so by clicking the record icon in the record tab.
- Modify record: to modify the record in view
- Workflow action: list of actions to manage the record state (i.e Status ) as defined in the workflow for the given module Table. The Actions that will get in this menu is governed by CRM workflow engine and the record State rules as defined by your CRM administrator.
- Forward Activity: lets you roll forward your Activity to next convenient day of your choice, if any associated to record in viewAudit Trail : full change history of the record
- Workflow report: change history of the record state
- Google Map: checks and locate the address in Google map for the records carrying address information (e.g. Account, Contact and Lead)
- Print record: lets you preview the record details and print
- Copy record: Copies the the record in view
- Attach files: lets you attach your files to the record
- Report template: lets you feed the record data to a specified report template to
- Social media connect: lets you connect to LinkedIn /Facebook/ twitter, find the contacts and save the contact’s social profile with the CRM record (e.g. Account, Contact and Lead)Managing Queries
Use the Query Manager link available in your “Fixed Links” Tile to manage queries.
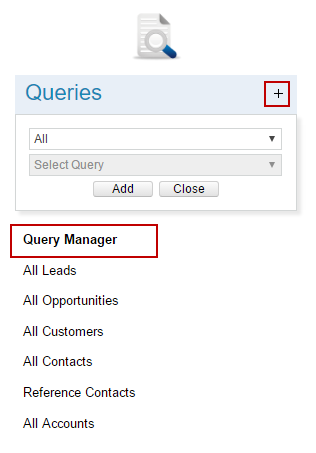
Query Manager list you the saved queries for you to run. This list includes private (i.e. created by you) and public (i.e.created by Admin) queries. The same list is available for you to pick while you design your Home Tiles. You can create, modify, copy, make public or delete your queries here. You can also set up how you like to see your Query Manager listing using My Setup> Query >Step
- Run: Select any Query from the list and click run to execute your query
- New: You can create two type of Query in CRM depending on your need Advance search : Let you build simple search by specifying one or more field value.

- SQL Query: Lets you build complex join query. You can define the query expression , sort by field(s), view list that you like to see in the query result.
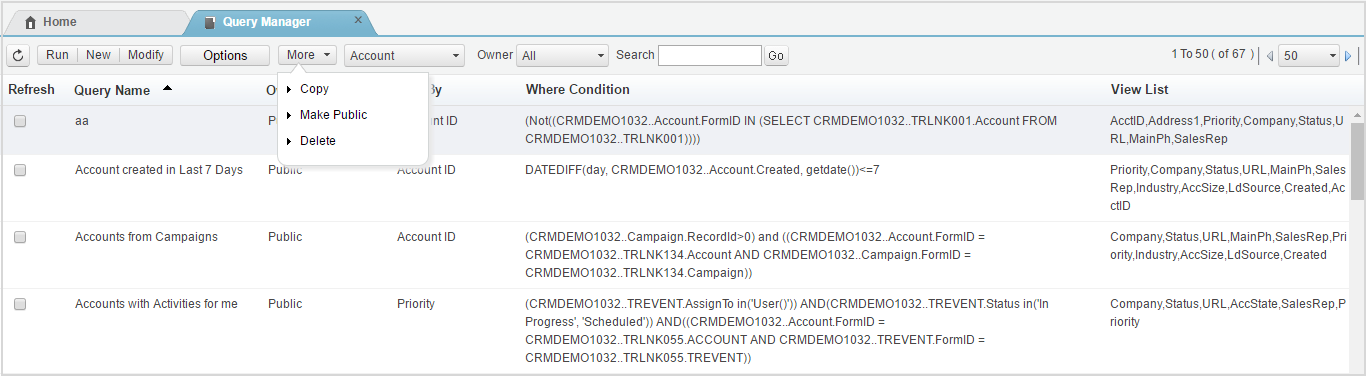
- Modify: Lets you modify the selected query.Copy: Lets you copy a save query
- Make Public: The query that you build here remains private for your use only. You can publish the query for all other CRM users by making it public.Queries created by Admin is assumed to be public and vice versa
- Delete: Deletes the query definition
- Module table list: List you the queries on context to the Table you select.
- Search: Lets you search the queries by name, you can also filter the queries by the Creator Owner.
- Manage Reports: Use the Report Manager link available in your “Fixed Links” Tile to manage reports. Queries
Report Manager list you the saved reports for you to run. This list includes private (i.e. created by you) and public (i.e.created by Admin) reports. The same list is available for you to pick while you design your Home Tiles. You can create, modify, copy, schedule, make public or delete your reports here. You can also set up how you like to see your Report Manager listing using My Setup> Report>Step 1.
- Run: Select any report from the list and click run to execute your report
- New: You can create 7 different types of reports here. Each report has its unique advantage to make your data CRM analysis and reporting easy.
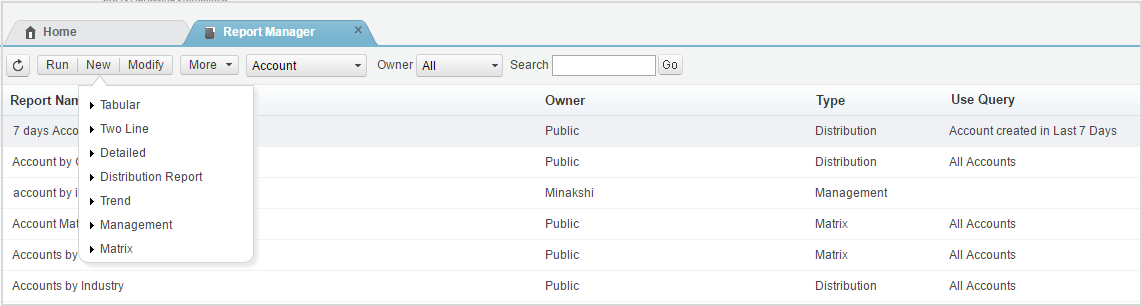
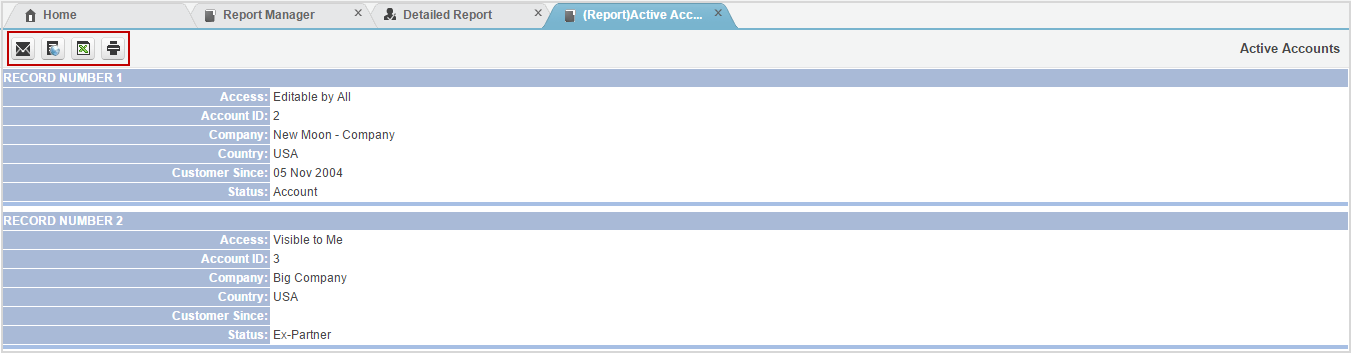
1. Tabular: This lets you create a simple tabular report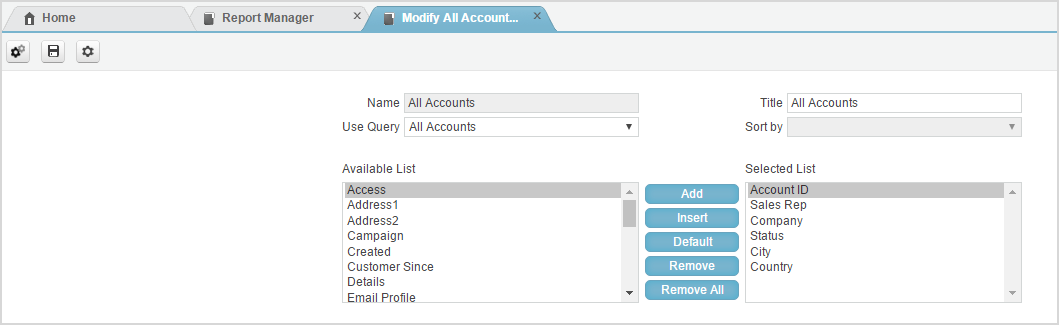
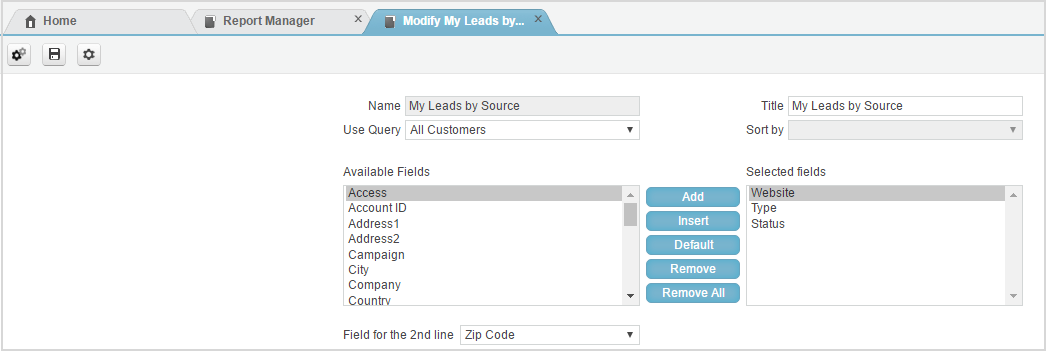
You should be able to email and save the report as html or excel 2. Two line report: This is similar to Tabular report with the specified field display option for the 2nd line
 You should be able to email and save the report as html or excel
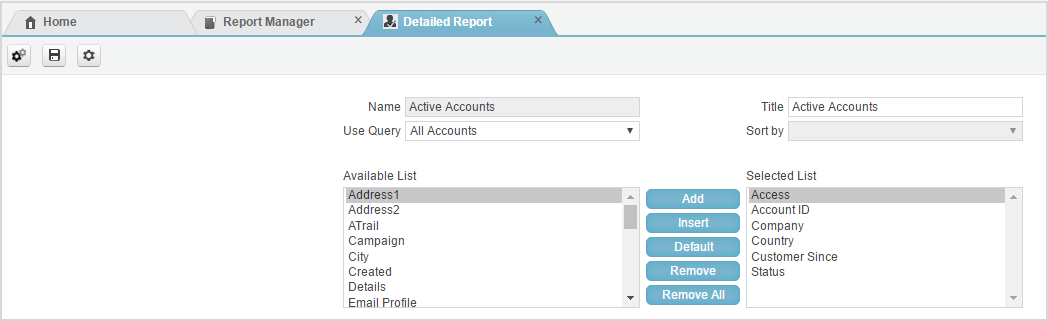
3. Detailed report: This is similar to Tabular report, only difference is – its ability to include Audit Trail field (i.e A Trail) in the report definition and display it in a different format.
You should be able to email and save the report as html or excel
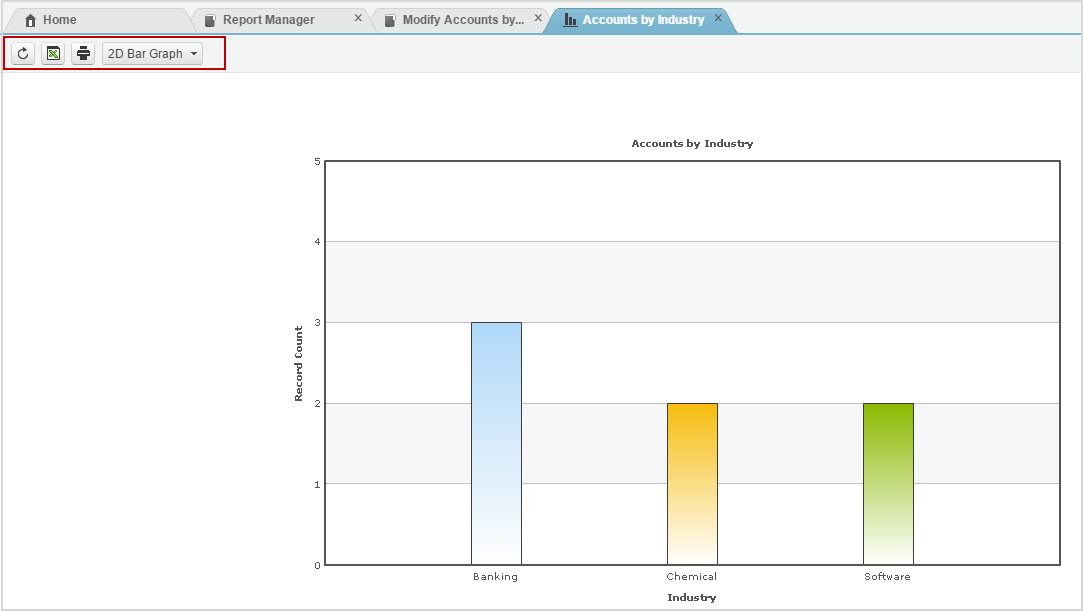
4. Distribution Report: This lets you create graphical report with different report parameters as marked in the diagram below.

This report comes handy to set up your CRM Dashboard with visual summaries.
The report graphics supports drilled-down to facilitate report analytics
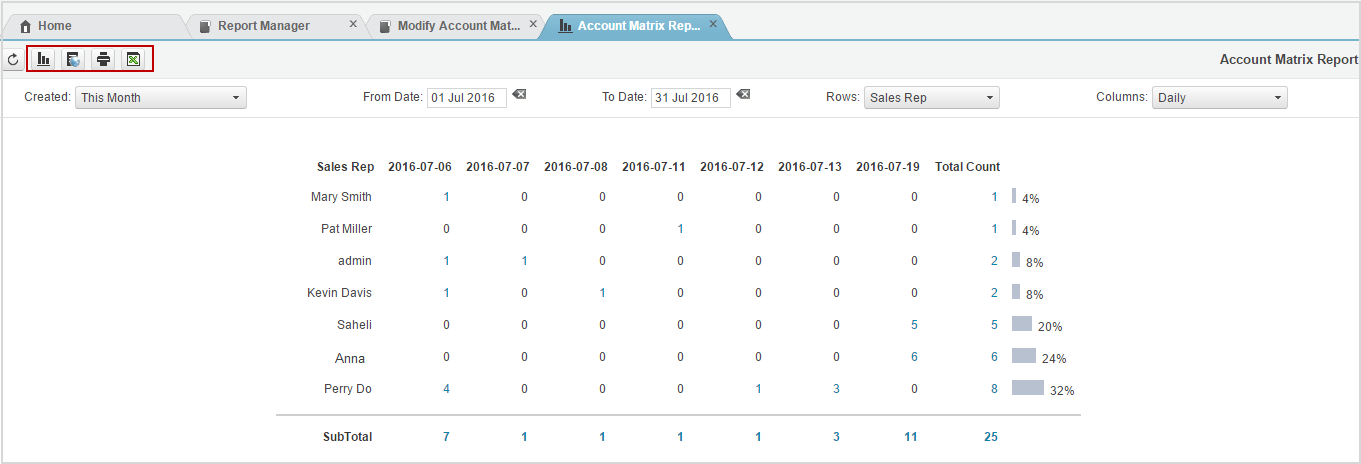
 5. Matrix report: This lets you create row, column field wise summary report for the given duration. You can specify query filter, grouping, Sum and other display columns to make the report fit your need.
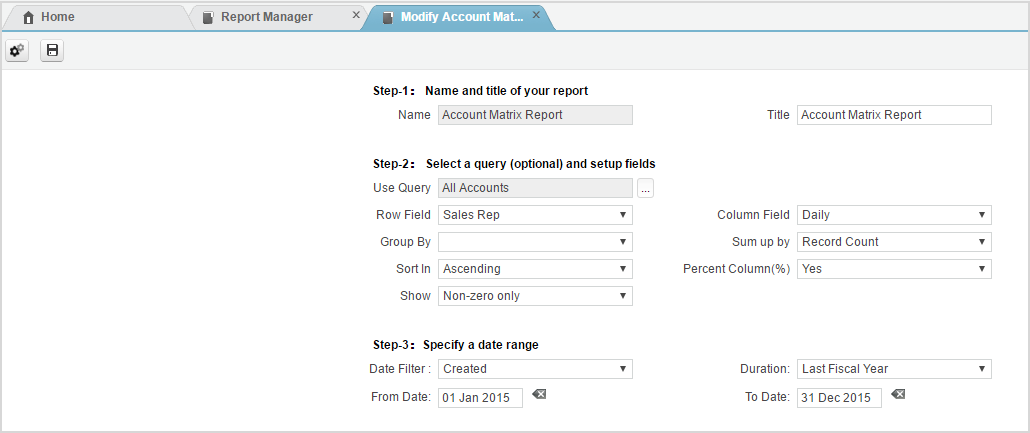 The report comes with a ‘what if analysis’ features, where in you can change the report parameters on the fly and check out the report results. You can also drill down on the report cartesians and summary points to extend your report analytics. The matrix reports are the best fit for manager users. You should be able to generate graphical representation of this report and save it as html or excel.
6. Trend report: This let you create report on a specified field to analyze the trend over specified time frame.
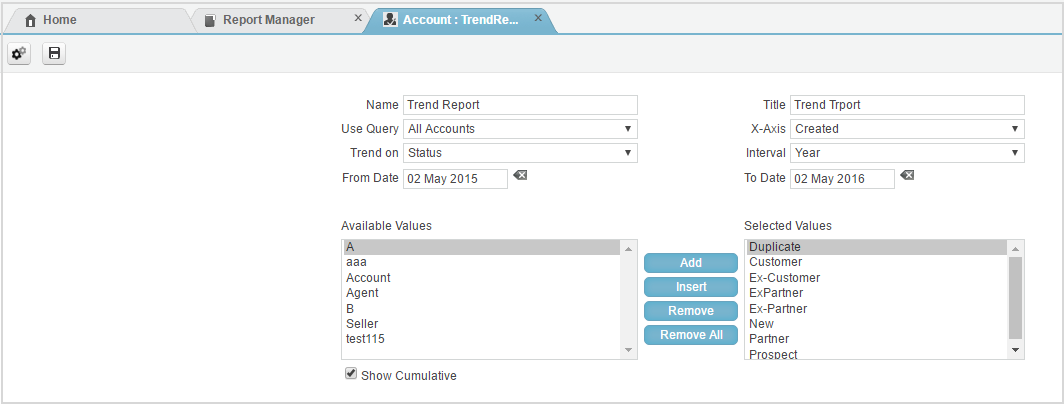 You can change the graphical representation of the report on the fly and export the data points to excel.
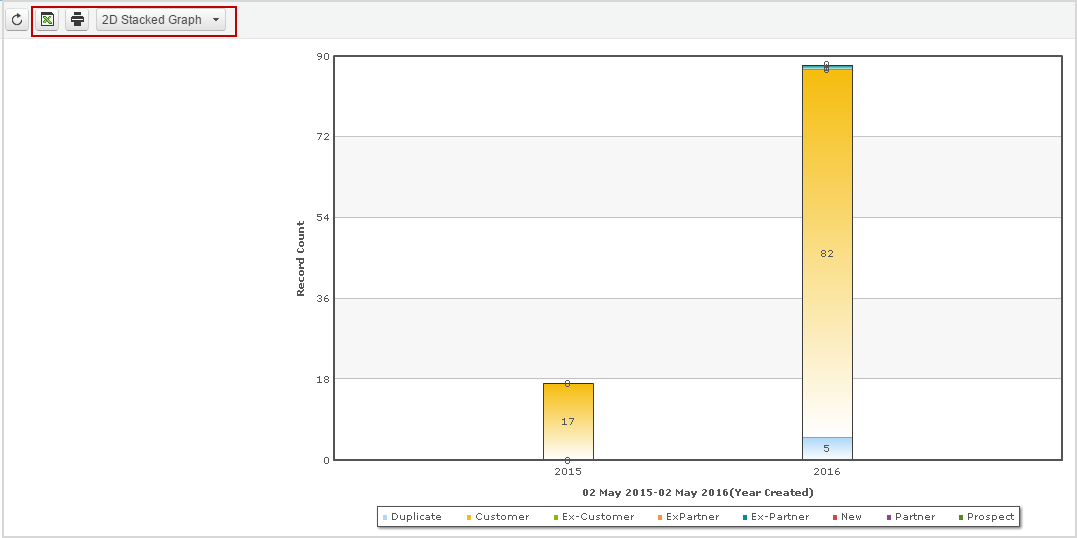 7. Management report: This gives you a framework to build custom report with Soffront CRM. Please contact Soffront Professional Service Team if you like to implement Custom report.
Modify: Lets you modify the selected report.Copy: Lets you copy a save report
Public: The report that you build here remains private for your use only. You can publish the query for all other CRM users by making it public. Reports created by Admin is assumed to be public and vice- verse.
- Delete: Deletes the report definition
- Scheduler: Lets you schedule a report to be sent to the specified user in CRM. Job Interval value 1 stands for daily.
Module table list: List you the reports on context to the Table you select.
Search: Lets you search the reports by name, you can also filter the reports by the Creator Owner.The Detailed View screen:

- User Group displays the User which has already been selected from the drop down list under Group Default.
- Select the Main Object to work with from the Object list.
- Move Recent Record items from the Available list to the Selected List by selecting them and clicking Add/ Insert. Multiple selections can be made using the Ctrl and Shift keys. Conversely, move items from the Selected List back to the Available List by selecting them on the list and clicking Remove.
- select yes/No to let the user Modify the setup
- Select an item from the Selected list then Click the click here to setup filter link to establish your list view parameter preference

- The selected item will have modify option. Click on Modify to set preferences.

- Move items from the Available list to the Selected List by selecting them and clicking Add/ Insert. Multiple selections can be made using the Ctrl and Shift keys. Conversely, move items from the Selected List back to the Available List by selecting them on the list and clicking Remove.
- Modify Filter: Select an item from the Available list then click on Modify Filter.

- Click on the checkbox to modify options
- then click on Save to save settings.
- Create Filter: Create filter allows you to add new filters .

- Fill in all the options then click on save to create new filter.
- Select a Default Function: Select any item from the Selected List dropdown option to make it a default for the filter.
- Sort Linked Records by: This option allows you to sort your records according to the selected option from the dropdown
- Check the descending order checkbox if you want to arrange your linked records in descending order. By default it will be arranged in Ascending order.
- Once you are click on the Ok to finalize your setting

15. Here you can all options have been added to the selected filter
