The purpose of this guide is to help you with the initial tasks of setting up Soffront Online CRM. We will discuss:
- How to sign in to your account for the first time.
- Personalize your account.
- Setup your password.
- Sign into your email inbox.
- Access Enterprise help site when you need assistance.
Once these steps are accomplished you will be ready to use this effective tool to successfully build your business.
Log into your soffront CRM Enterprise
- Enter the SF CRM URL (e.g. http://crmsrv.soffront.com/CRM10/sf_crm.html ) in the address bar of your Web browser. Bookmark the URL (i.e. link) in your browser for easy access.
The Login window displays on the page. If the login screen does not display, verify that you have typed the URL correctly, or contact your CRM administrator to verify that you have the correct URL. By default, the Soffront CRM application uses the Blue theme.
The CRM administrator assigns a user name and password to every user. If you have not received your user name and password, contact your CRM administrator.
If you cannot log in, take one of the following actions :
- Verify that the user name and password are correct.
- Verify with your CRM administrator that you have the correct user name and password.
- Contact your CRM administrator to ensure that your account has not been disabled.
3. Check Stay signed in option if you would like to login to SF CRM automatically any time you get online. Makesure your Web browser is allowed to accept cookies.
Personalize your CRM
- Click on Setup under links.
- Then click on Personal Settings under My Setup.
- Select your theme color and preferred language from the drop-down list.
- Click on Save to save your setting.

5. Log out, clear your browser cache and log back in to use your new theme.
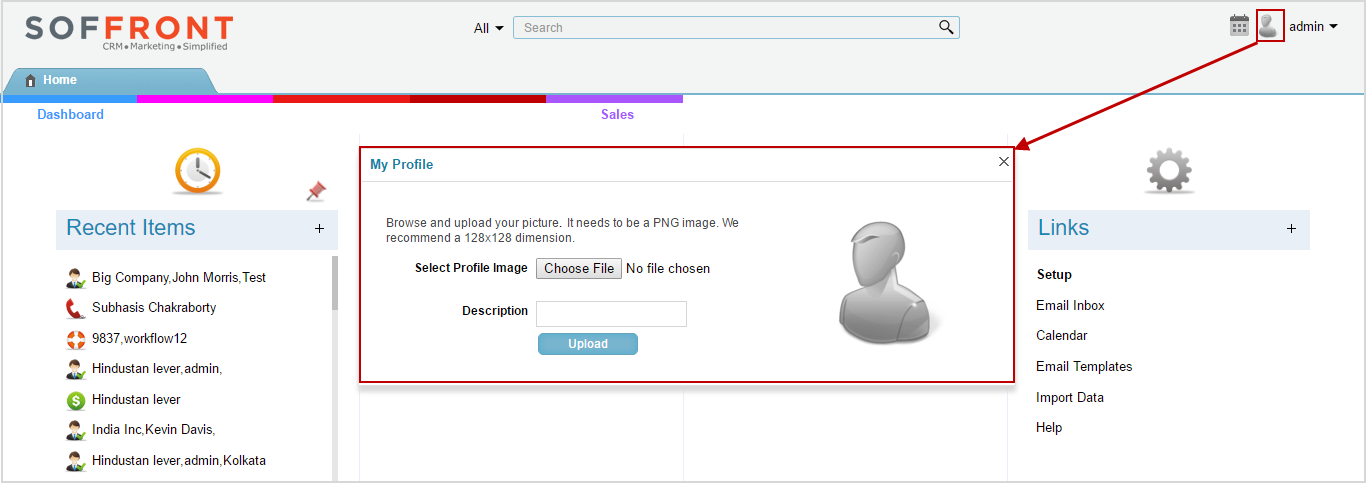
Add your profile picture
- On home page click on the
 icon on the top right hand corner of your home screen.
 - On My profile page click on Choose file to browse and add an picture from your computer.
- Add a small description the click on Upload.
- Your profile pic will appear at the top right hand corner of the home screen.
Change your Password
Signing in for the first time , you will get your username and password from your Administrator. Once you sign in you can change your password to anything you like.
- From home page click on setup under Links.
- Then click on Password Under My Setup.
- Here you can setup your new password then click on save.
- Log out, then log back in to activate your new password.

Inbox Sign in
Note: Before signing in to inbox, Email Server has to be setup first. and the Administrator must set up an email account with a valid email address.
- Name- User Name
- Email- Existing email address
- Password- Associated password
- Click on login

Notes: Inbox sign in page shows up when signing in for the first time
Email Inbox
We will discuss the fully featured inbox in the next few pages.

Inbox Setting
Click on setting to open email setting page.

- Common: Here user can set the look’n’feel of their accounts.
- Skin: User can select a theme from the dropdown list.
- Layout: Select a layout type for the inbox.
- Language: Select the preferred language from the dropdown list
- Messages per page: User can select the number of messages displayed on each page
- Contacts per page: User can select the number of contacts displayed on each page.
- Default editor: User can select the text type from the dropdown list
- Auto check mail every: User can set a time for the email to sink and check for new emails after each interval.
- Time offset: User can select their time-zone from the dropdown list.
- Time Format: User can select their time zone format.

- Click on Email Account:
- Properties: Email Setup details

- Signature: User can add a personalized signature.

- Manage Folder: User can Add new folder, Setup special folders and Delete selected

Add new Account: user can add new accounts under one User.
- To add a new account click on Add New Account

- Type in all the required fields then click saves.
- Click on your email address to go back to Inbox.
Soffront Enterprise Help site
How to get to help if you get stuck or need guidance to navigate through Soffront CRM. Soffront CRM Help helps you to understand and utilize the product to its fullest.
1. log into Soffront CRM.

2. Click on Help on the main Menu to open saffron Help page

- Announcements: Describes the newest feature on your Soffront Enterprise CRM. You can subscribe to this post to get regular updates
- Release Notes: Release notes provides you with detailed information about new features, big fix and enhancements.
- User & Admin Guides: User Guide and Admin Guide helps you setup and navigate through Soffront CRM Features.You will also find specific detailed guides under other guides.
- API Guides: API Guides helps you to integrate Soffront CRM with third party application using API. In this Guide you will find detailed URLs and Codes in java, HTML and HTTP to make your work easier.
- Videos and Webinars: Videos and webinars provides you with descriptive visual demo which helps understanding and operating Soffront CRM much easier. You can also look for specific videos or modules from the YouTube Playlist.
- Outlook Integration: Allows you to download and install latest Outlook built. Installation guides are provided beside the built s for your convenience.
- Ideas: Post your Ideas, what should we build next. All your ideas are most welcomed; It helps us to create a CRM that the users love to work with.
- Customer Service Portal:Last but not the least Customer portal helps you submit tickets and track them from submission to resolution.
Soffront CRM helps you to understand and utilize the product to its full potential.