The new and improved Customer portal features a collection of gadgets with tight integration to the core CRM. The responsive dashboard helps create and maintain customer profile, add and track tickets, set up projects , manage contacts, view knowledge base and more.
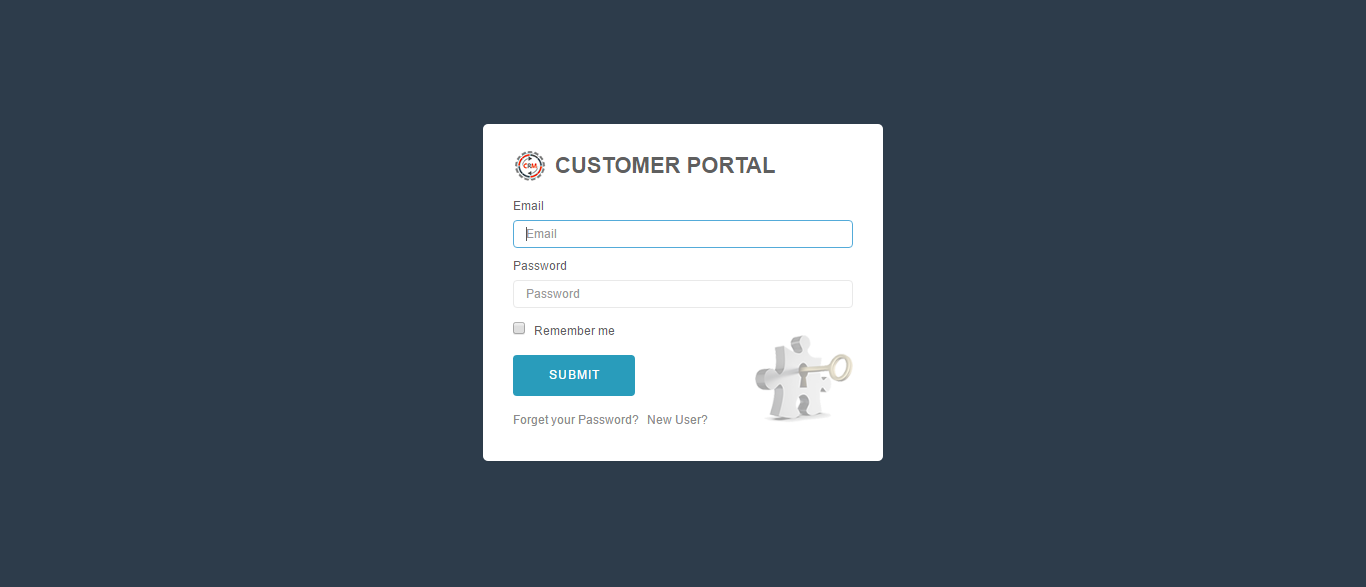
Type in your email address and password to login, check the “Remember me” checkbox to stay logged in.
Forget your password: Click to recover your password. Your new password will be send to your email address.
New User? : Click on “New User? ” to register your information in the system and create a portal account. A new contact will be added to the Soffront CRM and will be linked to the correct account, you will receive your new login information through mail. This login can be used to sign in to your KMS, Portal and Forum as well.

Setup Company Logo, header and Footer message for your Portal
You will be able to add your company logo, header and footer message to the portal from your Soffront CRM admin account.
- log into Soffront CRM.
- Click on Setup to open Setup menu.
- Click on Setup under Portal settings.
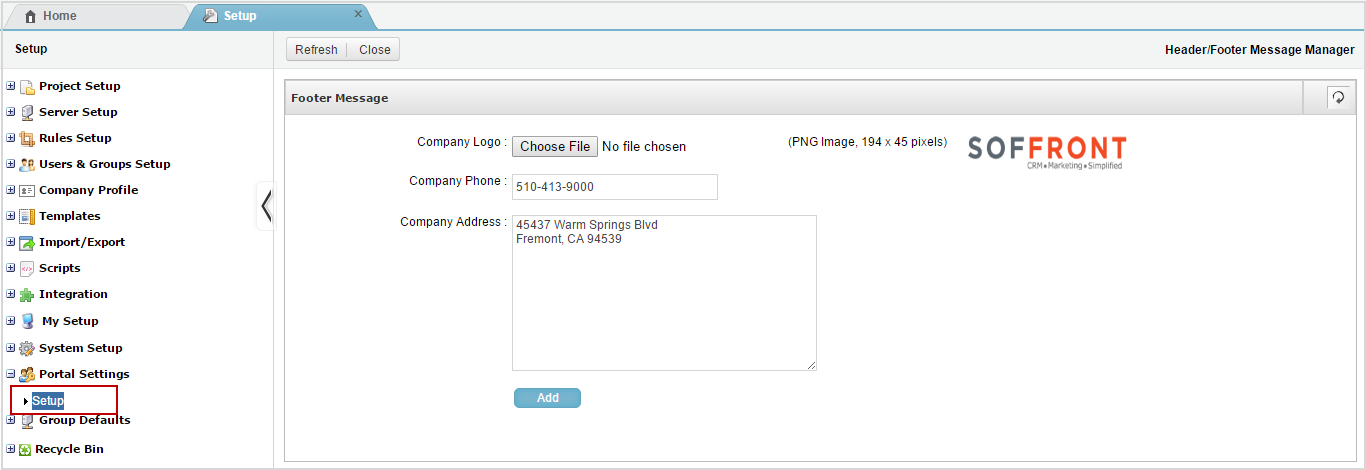
- Company Logo: Click on Choose File button to browse and select a company logo from your computer.
- Company Phone: Type in company phone number in the text box.
- Company Address: Type in Company address in the text box.
4.Click on Add to add the message . The following message box is displayed. Click on Ok to save the message.

5. Refresh: Click on Refresh to refresh contents of the page
6. Close: Click on close to exit window and go back to the Portal settings page
Customer Portal Icons
- Click
 to Sign out of the portal.
 - Click
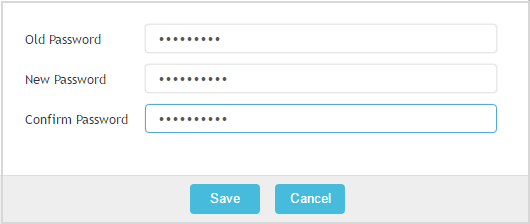
 to change password.
- Add old password , New Password, Confirm new password then click on save to change password.
- Click
 to add profile information.
 - Click
 to go to Knowledge base.
Portal Dashboard
Customer portal Dashboard allows you to access responsive screens that displays the following informations:
Status: Status section displays the summary of all current activities in the portal. Click on each item to drill down to detail result in list format. It contains information on number of tickets in various stages such as number of open tickets, number of tickets resolved and more.
Submit Ticket: Submit ticket allows you to report issues or request to the support team.
- Synopsys : Describe this issue in one short sentence.
- Details : Here you can write down the details of your issue.
- Category: Select whether it is a Issue or a request.
- Severity: Select the urgency level to fix the issue or resolve the request.
- Product : Select the product for which you are reporting request or issue.
- Choose File : You can add up to three documents or images to support your issue/ request.
- Click on submit to send the ticket.
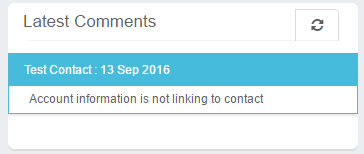
Latest Comments: Latest comments section will display latest “Public” comments/notes that are added by the CRM user to a ticket or Projects. Click on the link once see synopsys or double click the link to open the corresponding detail view of the Ticket, Project or Child notes.
Latest News: Latest News Section will display “News” added on the Alerts table of the CRM. Click on the news link to read the full news.
Latest Announcements: The announcements section will display the “Announcements” added on the “Alerts” table of the CRM. Click on the more link to see the whole announcement.
Follow the steps below to add Latest News or Latest Announcement.
- log into Soffront CRM.
- Search and open Alert page.
- Click on New button to create a new News/Announcement.
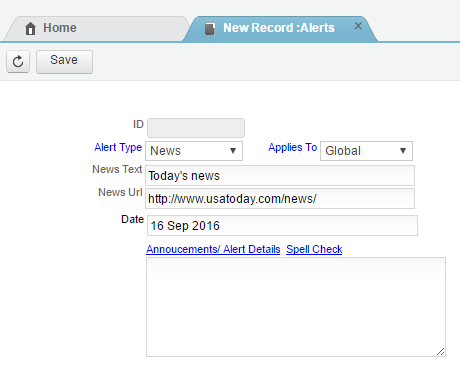
- ID : ID will be filled in automatically
- Alert Type: Select from the dropdown whether you want to post a news or an Announcement.
- Applies To: Select from the drop down whether it’s a Global or a Local News/Announcement
- News Text: Add News Text this will be displayed as the heading of the news.
- News URL: Add the news URL in this field.
- Date: Add the date of the News/Announcement.
- Announcement: Add announcement details in the text box
- Click on Save to add News/Announcement.
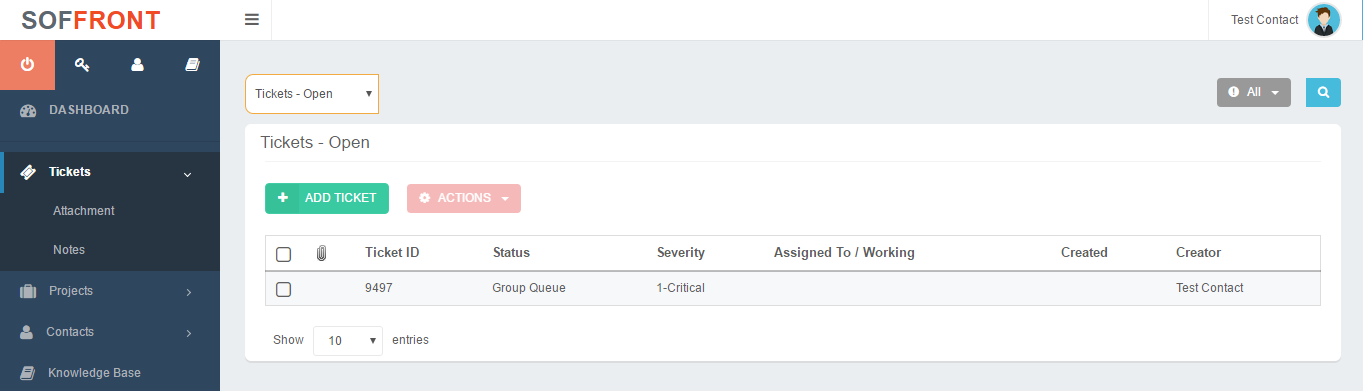
Tickets
Ticket allows you to view all tickets add new tickets and actions.
- Click on the dropdown to select Open- Tickets, Resolved-Tickets and My-Tickets.
- You can also filter tickets from the
 dropdown list on the right hand corner.
 - Click on the
 to search tickets with Ticket ID and key word in synopsys.
Setup Ticket Form
- log into Soffront CRM.
- Click on Setup to open Setup menu.
- Click on Forms(DHTML) under project setup.
- Select Tickets from Form Name drop down list.
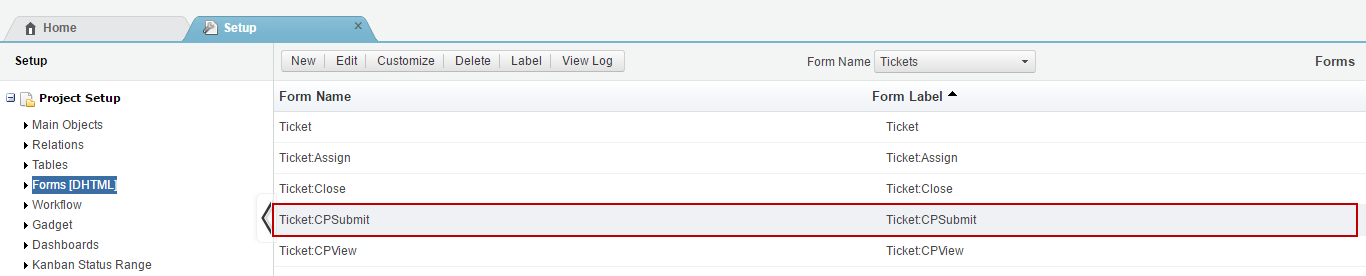
5. Select Ticket:PCSubmit form then click on Edit to edit form.
6. Once you have added the fields for Ticket submit form that will be displayed in the Customer Portal, click on save.
7. Click on Workflow under project setup.
8. Select Ticket from the dropdown list.

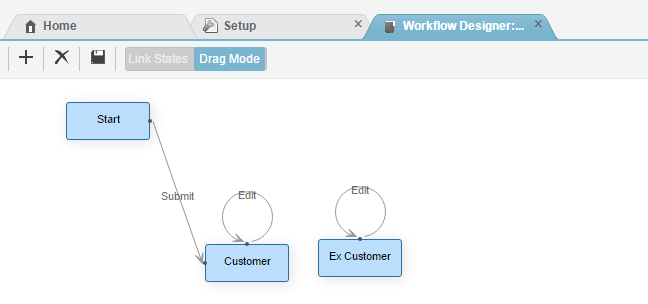
9. Select Contact workflow for CP then click on edit.
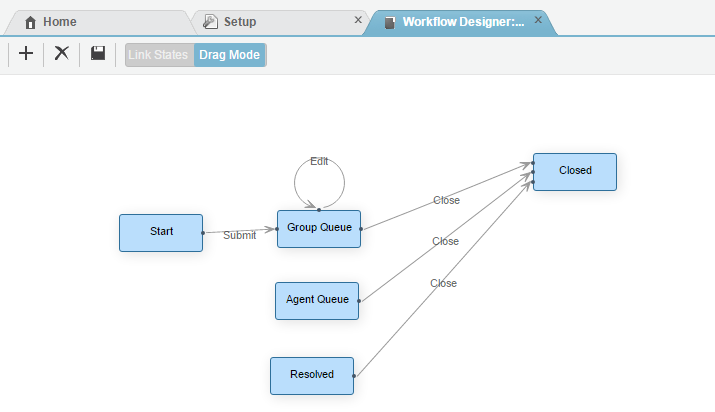
10. Make sure the workflow is setup as shown below.
Add a New Ticket
- Click on
 to Add a new ticket.
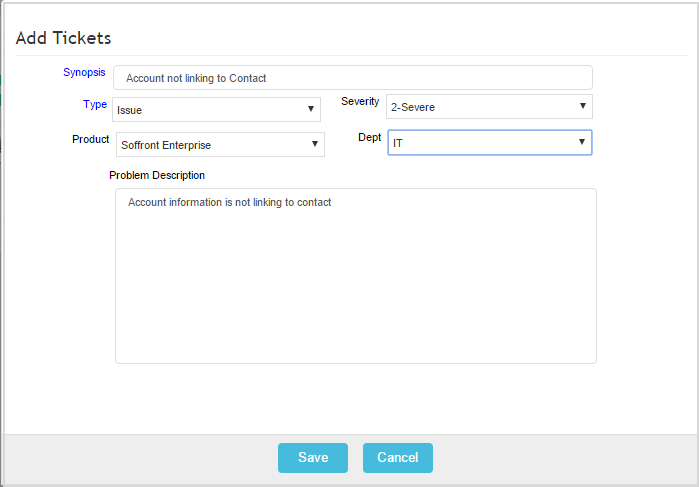
- Synopsys : Describe this issue in one short sentence.
- Type: Select whether it is a Issue or a request.
- Severity: Select the urgency level to fix the issue or resolve the request.
- Product : Select the product for which you are reporting request or issue.
- Problem Description: Here you can write down the details of your issue.
- Click on Save to submit ticket.
Double click on a ticket to open ticket details. Here you can create an action, add attachments and notes to the ticket.
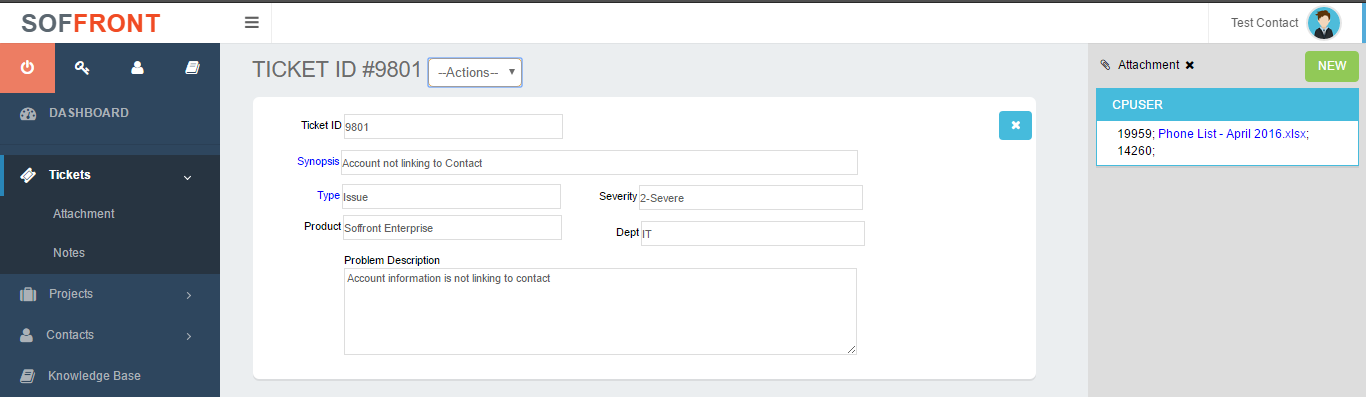
- Actions: Click on the Action dropdown to select action
- Attachment: Click on Attachment to see all ticket attachment , click on new button to add a new attachment.
- Notes: Click on Note to see all ticket notes, click on new button to add new notes to the ticket.
Projects
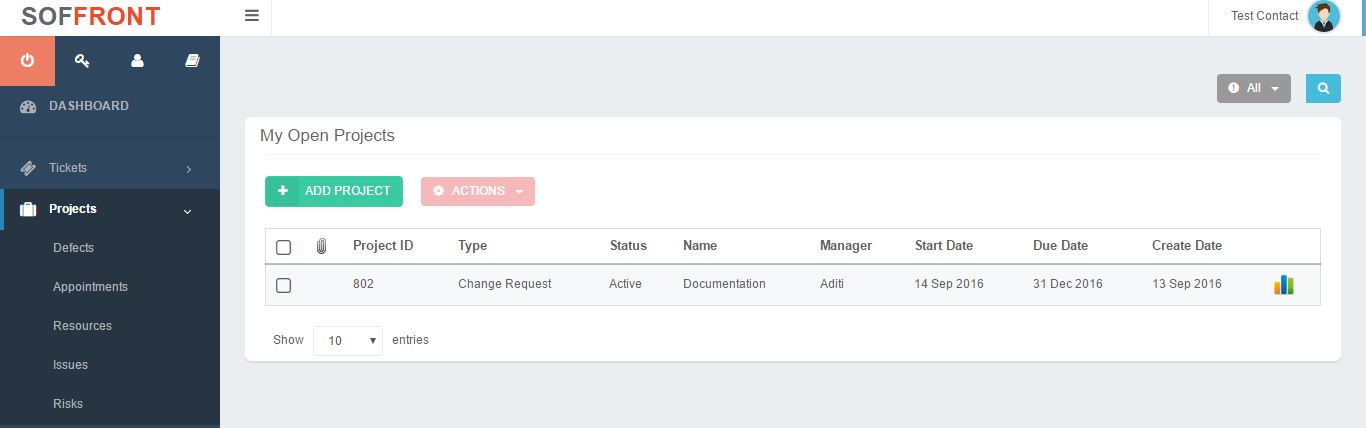
Project allows you to see all projects in a listview.
- You can also filter Projects from the dropdown list on the right hand corner.
- Click on the to search Projects with Project ID and key word in synopsys.
- Click on
 at the end of each project record to open gantt chart.
Setup Project Form
- log into Soffront CRM.
- Click on Setup to open Setup menu.
- Click on Forms(DHTML) under project setup.
- Select Tickets from Form Name drop down list.
5. Select Ticket:PCSubmit form then click on Edit to edit form.
6. Once you have added the fields for Ticket submit form that will be displayed in the Customer Portal, click on save.
7. Click on Workflow under project setup.
8. Select Ticket from the dropdown list.
9. Select Contact workflow for CP then click on edit.
10. Make sure the workflow is setup as shown below.
Add New Project
Click on ![]() to add a new Project. Fill in all the fields then click on save to add new Project.
to add a new Project. Fill in all the fields then click on save to add new Project.
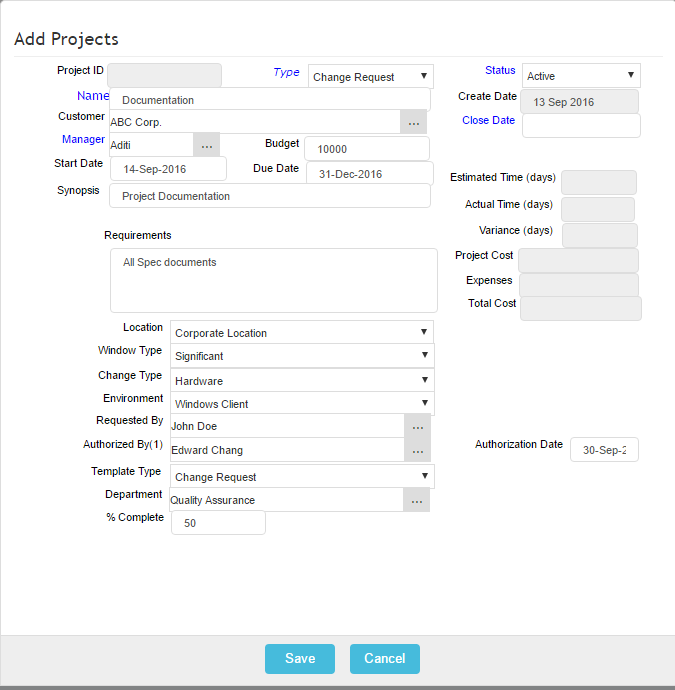
Double click on a Project record to open Project detail view.
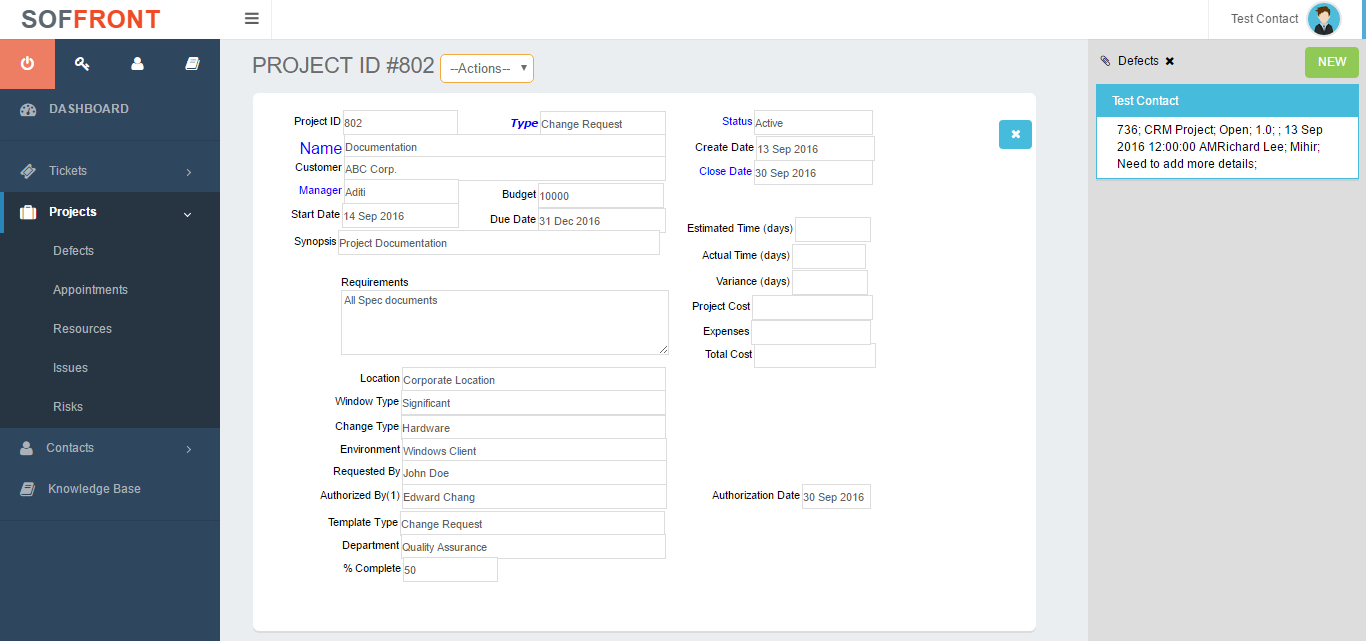
- Actions: Click on the Action dropdown to select action for the Project
- Defect: Click on Defect to see all Project defects , click on new button to add a new Defect.
- Appointments : Click on Appointment to see all appointments connected to the Project. Click on New button on right hand column to add new appointment.
- Resource: Click on Resource to see all resource allocated to the Project. Click on New button on right hand column to allocate new resource.
- Issue: Click on Issue to see all issues related to the Project. Click on New button on right hand column to add new issue to the project.
- Risk: Click on Risk to add risk related information to the Project. Click on New button on right hand column to add new record to the project.
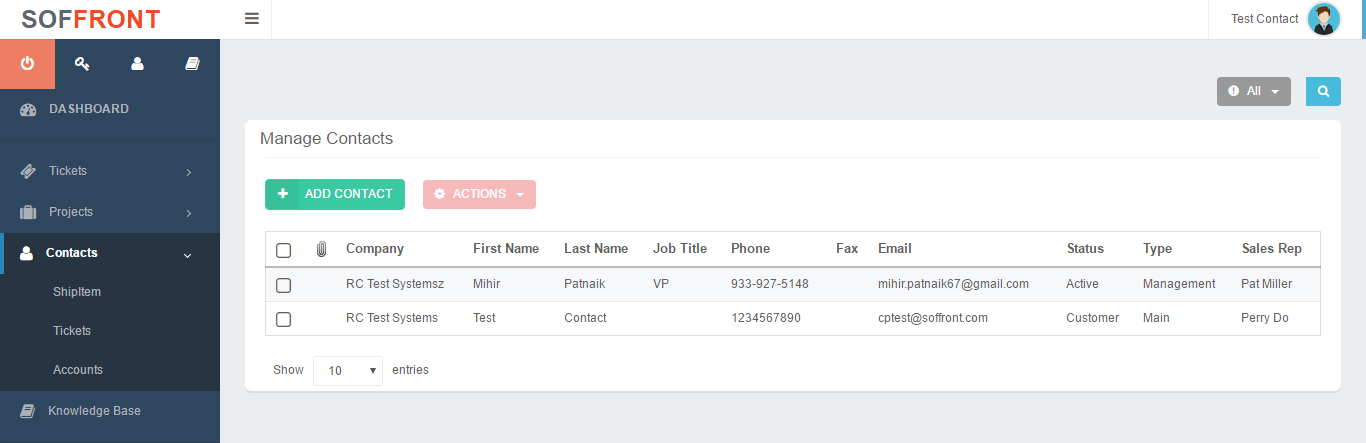
Contacts
Contacts allows you to see all contacts added in the Portal
- Filter Contacts from the dropdown list on the right hand corner.
- Click on the to search Contacts with company name, first name, last name and more.
Setup Contact Form
Setup the add contact form from your soffront CRM that will be displayed in the customer portal
- log into Soffront CRM.
- Click on Setup to open Setup menu.
- Click on Forms(DHTML) under project setup.
- Select Contacts from Form Name drop down list.
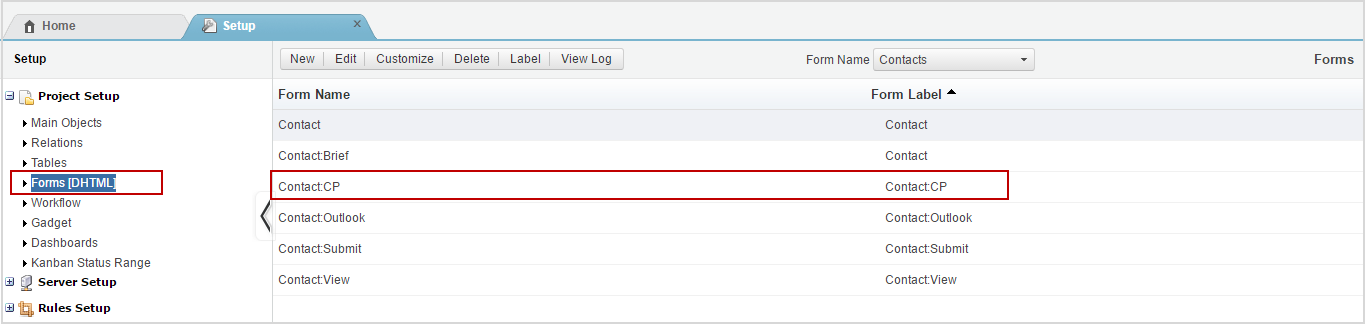
5. Select Contact:PC form then click on Edit to edit form.
6. Once you have added the fields for contact form that will be displayed in the Customer Portal, click on save.
7. Click on Workflow under project setup.
8. Select contact from the dropdown list.

9. Select Contact workflow for CP then click on edit.
10. Make sure the workflow is setup as shown below.
Add new Contact
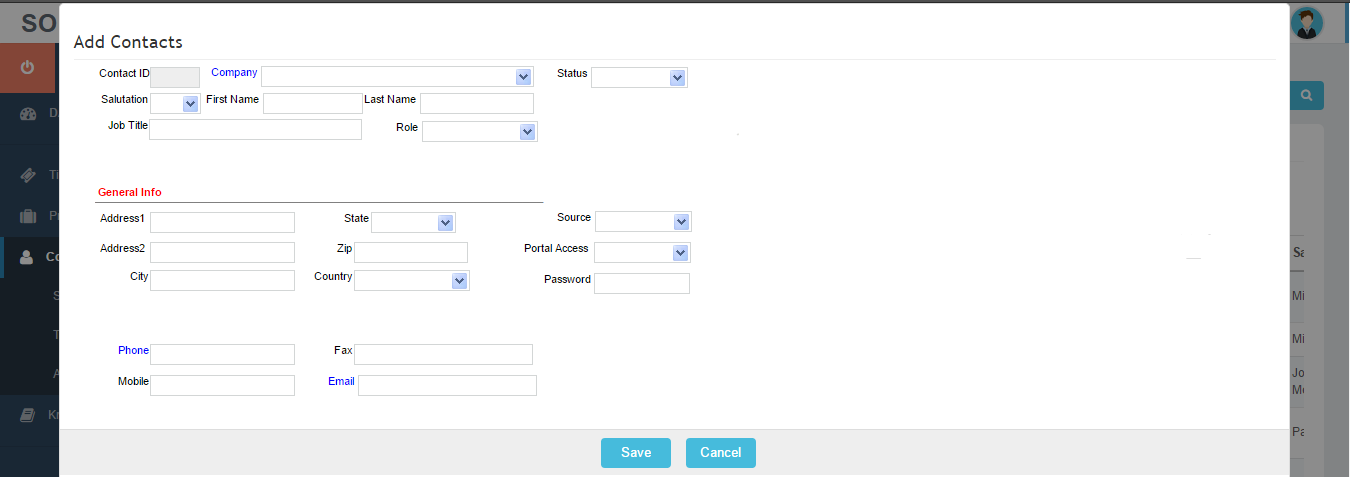
Click on ![]() to add a new Contact. Fill in all details then click on Save.
to add a new Contact. Fill in all details then click on Save.
Double click on a contact record to open detail view.
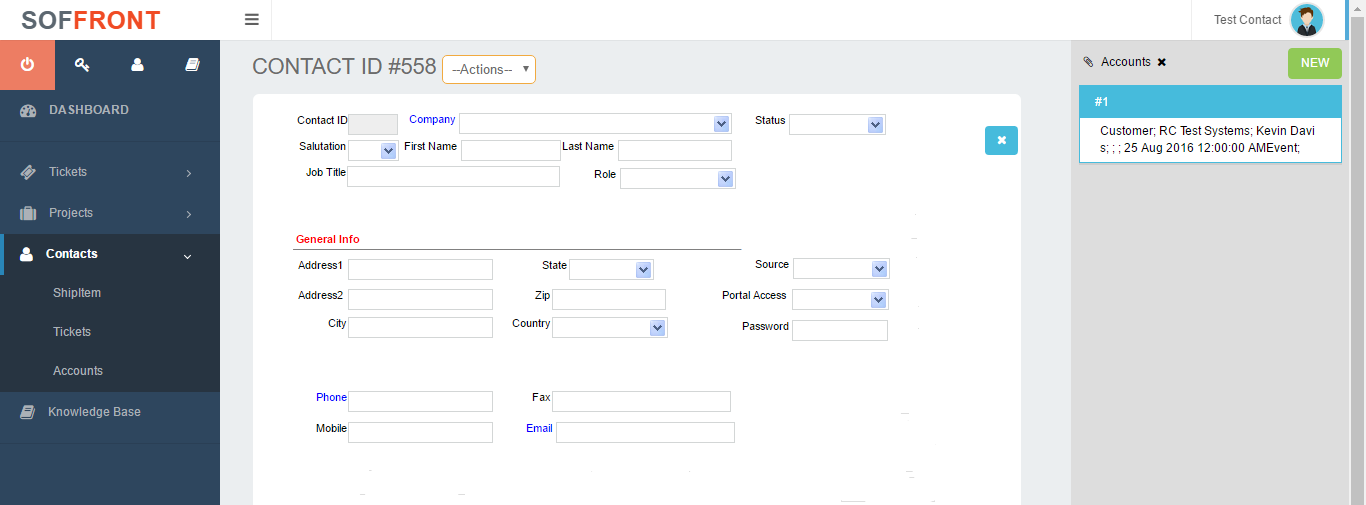
- Actions: Click on the Action dropdown to select action for the Contact.
- Ticket: Click on Ticket to see all tickets connected to contact , click on new button on right hand column to add a new Ticket.
- Shipment: Click on Shipment to see all shipments connected to contact , click on new button on right hand column to add a new shipment.
- Account: Click on account to see account connected to the contact. click on new button on right hand column to add a new account.
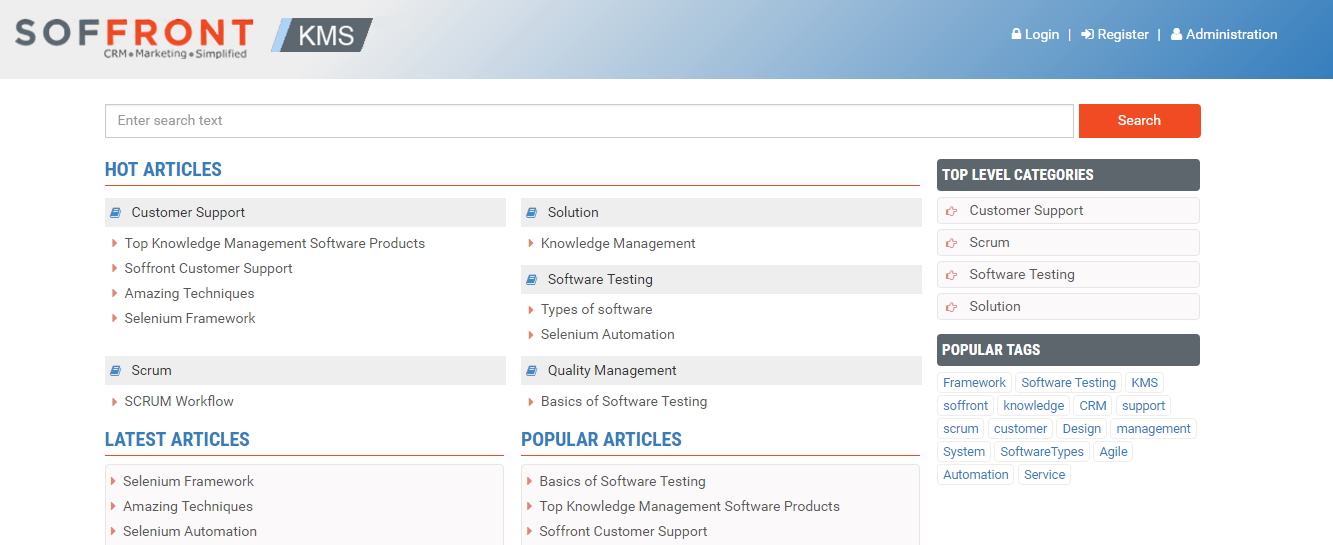
Knowledge Base
Click on Knowledge Base to access Soffront KMS, It is a centralized repository for information which can be used internally by the organisation. Knowledge base can give customers easy access to information that would otherwise require contact with organization’s staff. Soffront KMS comprises of Knowledge base articles, customer support articles, Solutions and more.